Introduction
Motion analysis is widely used in clinical, research, and athletic settings to assess joint function, identify movement inefficiencies, and inform rehabilitation or performance programs. While 2D video analysis remains a popular and accessible tool, it comes with important limitations—especially when compared to 3D systems such as IMU-based motion capture.
This article explores the critical differences between 2D and 3D analysis, with a special focus on how joint angles—particularly knee valgus—can be misunderstood when only one perspective is available. Understanding how these systems define and calculate motion is essential for interpreting data accurately and avoiding false conclusions.
The Fundamental Difference Between 2D and 3D Systems
2D Video Analysis:
In a 2D system, motion is captured from a fixed camera perspective—typically in the sagittal or frontal plane. The user manually or automatically tracks joint positions and angles based on visible pixel coordinates. Because this approach flattens a three-dimensional action into a single plane, it inherently lacks depth information and rotational data.
3D IMU-Based Motion Capture:
In contrast, 3D inertial motion units (IMUs) measure motion in all three planes by tracking angular velocity and linear acceleration across multiple body segments. IMUs calculate joint angles using the orientation of one segment relative to another (e.g., the shank relative to the thigh). These calculations are based on anatomical coordinate systems—not on camera perspectives—providing a more anatomically valid representation of joint kinematics.
Common Misinterpretations in 2D Analysis
The visual simplicity of 2D analysis is also its greatest flaw. Because it relies on a single camera view, depth and rotation are lost, and joint angles can be severely misrepresented.
In practice, this means:
- Hip internal or external rotation may be invisible in a frontal plane video.
- A scapula may appear winged when viewed from the side but may be completely neutral from above.
- What appears to be knee valgus might be a combination of hip and ankle movement that only looks like a knee issue from the front (which we’ll talk about conceptually below as differences in how clinical knee valgus is defined vs biomechanical knee abduction.
Without three-dimensional segmental data, visual judgments are vulnerable to parallax error and misinterpretation.
What is Parallax Error?
Parallax error occurs when an object appears to shift position due to a change in the viewer’s line of sight. In 2D video analysis, this can significantly affect perceived joint angles and movement trajectories.
Let’s take a look at an example of a video recorded with the camera placed in an ideal position (perpendicular to the movement and level) vs the same video recorded from a different camera in a non-ideal position.
Skewed perspective:
The camera is rotated clockwise from the perpendicular plane, slightly behind the subject, and lookling slightly up to the subject (camera is below hip height).
- Trunk Lean: 14 degrees
- Hip Flexion: 55 degrees
- Knee Flexion: 49 degrees
- Ankle Dorsiflexion: -2 degrees
Ideal camera position:
The camera is placed perfectly perpendicular to the plane of movement at hip height with the subject centered in the frame.
- Trunk Lean: 11 degrees
- Hip Flexion: 52 degrees
- Knee Flexion: 44 degrees
- Ankle Dorsiflexion: -8 degrees

The differences are subtle, but there. There are several differences in the degrees of sagittal plane angles being reported due to the camera simply being placed in the wrong orientation. I purposefully chose an example with with a relatively realistic representation of bad camera placement to show the realistic effects, but you can extend this to example to understand that the angles will become more and more “off” the farther “off” the camera position gets.
Because cameras capture motion from a single fixed angle, any lateral or rotational motion that moves in or out of the plane of view may appear exaggerated or minimized, depending on the viewer’s perspective. This is especially problematic when analyzing multiplanar movements like gait, jumping, or throwing, where joint alignment in the frontal or sagittal plane does not reflect the true spatial orientation of limbs.
For example, a slight hip rotation might make it appear that the knee is moving medially (valgus) in a 2D frontal video, even if the knee joint remains aligned relative to the thigh. This misrepresentation can lead to incorrect assessments and training interventions if not cross-referenced with more objective 3D data.
For more details on proper camera setup for 2D markerless motion analysis, reference the following resoureces:
Case Study: Knee Valgus – Clinical vs. Biomechanical Definitions
One of the most commonly misunderstood joint motions in video analysis is knee valgus. In clinical practice, dynamic knee valgus is typically defined as an inward collapse of the knee in the frontal plane. It’s a red flag in injury risk screening and performance analysis—but what exactly is being measured?
In reality, what we see as valgus is rarely the result of motion at the knee alone. Instead, it is typically driven by:
- Hip Internal Rotation
- Hip Adduction
- Ankle Eversion
Biomechanically, this is a compound movement pattern—not a true frontal plane deviation at the knee.
In a 3D IMU system, the knee abduction/adduction angle is defined differently:
- It measures the movement of the shank relative to the thigh, and is calculated in the plane of the thigh segment, not in the global frontal plane.
- This means that if the thigh is rotated (e.g., internally rotated at the hip), what appears to be abduction in a frontal video view may actually be adduction when measured relative to the thigh.
This is why new users of 3D motion capture coming from 2D video analysis often report confusion when the knee appears to collapse inward on video, yet the 3D data shows the knee in adduction. The discrepancy is not a bug—it’s a matter of reference frame.
Let’s look at a clear example…
In the video below, you can see a 3D analysis of a vertical jump as well as 2D analysis of the same jump.
As we break this down at a single frame after landing, you can start to see some staggering differences.
Knee Valgus/Knee Abduction:

In the image above after jump landing, we the Knee Abduction angle is -2.3 degrees using the 3D system (meaning there is 2.3 degrees of adduction), and the Knee Abduction angle is -22 degrees with the 2D analysis (meaning there is 22 degress of adduction). This is a difference is nearly 20 degrees!
So why is that? With the 2D system, we don’t have any rotational insight. We have no idea how much the hip is rotated or if the ankle is inverted. We have some measure of Hip Abduction/Adduction, but again, the results are only as good as the camera perspective.
Looking closer at the 3D system results, we can see there is some hip rotation playing into the results. The left hip is externally rotated by 0.4 degrees and the right hip is internally rotated by 1.4 degrees. The feet are also externally rotated with some inversion, which means the knee collapse is not happening entirely in the frontal plane.
The Role of Segment Planes in 3D Joint Angle Calculation
In 3D analysis, each joint angle is computed using anatomical coordinate systems defined by how segments (like the thigh and shank) are oriented in space. The segment plane for the thigh, for example, is defined using anatomical landmarks such as the femoral head and patella.
This approach offers powerful advantages:
- Joint angles are based on true anatomical relationships rather than appearance.
- 3D rotations like hip internal/external rotation, which are invisible in 2D views, are captured and quantified.
- Complex joint mechanics—such as coupled movement patterns—can be decomposed and understood in isolation.
However, this also introduces complexity. Interpreting a joint angle like knee abduction requires awareness of:
- What plane it’s calculated in.
- What segment it is referenced to.
- How the orientation of that segment affects the reported value.
In the image below, the thigh segment plane is shown by the red line connecting the femoral head to the patella, and the 3D model is rotated so that the Knee Abduction angle is better visualized from the reference plane of the thigh bone. It’s more clear that the knee is abducted by only 2 degrees from the thigh refernece plane from this perspective.

Understanding these reference frames is key to unlocking the full value of 3D IMU systems—and avoiding mismatched expectations based on 2D visuals.
Practical Considerations for Researchers and Practitioners
Both 2D and 3D systems have their place in movement analysis. Choosing the right tool depends on your goals, resources, and need for precision.
Use 2D video analysis when:
- Performing quick movement screens.
- Working in settings with limited equipment.
- You only need gross qualitative insights.
Use 3D IMU analysis when:
- You need to quantify motion across multiple joints and planes.
- You are analyzing rotation (e.g., hip or torso mechanics).
- You are evaluating asymmetries, coupling, or kinetic chains.
When interpreting IMU data:
- Be cautious comparing values directly to what you “see” in video.
- Consider the role of segment rotation in skewing visual interpretation.
- Educate clients and team members about how angles are defined to avoid miscommunication.
When 2D Video Analysis Is Most Valuable
While this article emphasizes the limitations of 2D video analysis in capturing true three-dimensional joint mechanics, it’s important to recognize that 2D video tools still provide meaningful insights in many practical scenarios.
Key strengths of 2D video analysis include:
Gait Event Detection and Timing: When paired with contact detection (video-based foot-strike timing embedded into the MR software or even a separate insole or force system), 2D video can accurately identify gait events such as initial contact, toe-off, and stride duration. This makes it a useful tool for evaluating temporal parameters in clinical or field settings.
Visual Pattern Comparison: 2D video provides intuitive, side-by-side comparison of movement patterns across time, trials, or limbs. This is especially helpful for visually identifying compensations, postural shifts, or technique differences in activities like gait, running, squatting, or jumping.
Accessibility and Speed: 2D setups are typically low-cost, easy to deploy, and fast to interpret. For the quickest movement screenings, 2D video remains a go-to solution.
Supplementing 3D Analysis: Even when using 3D systems, video recordings can serve as a valuable companion for context, troubleshooting, or providing visual feedback to clients or athletes.
Below is an example of a report that can be generated for 2D analysis that displays gait parameters and points of interest.

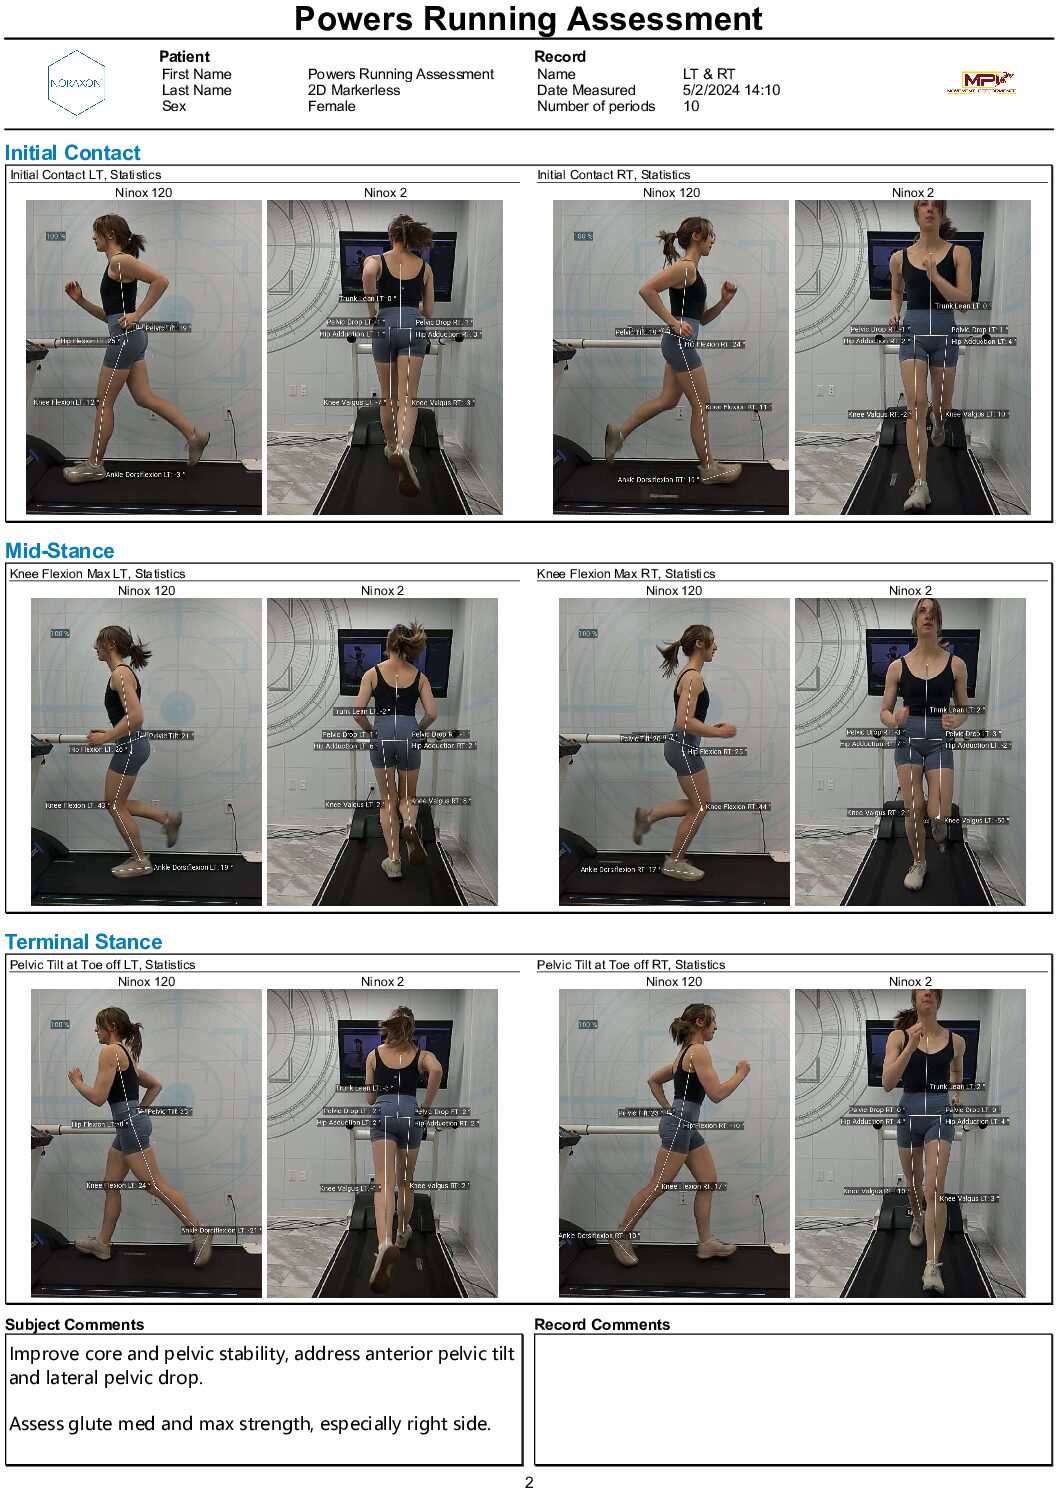
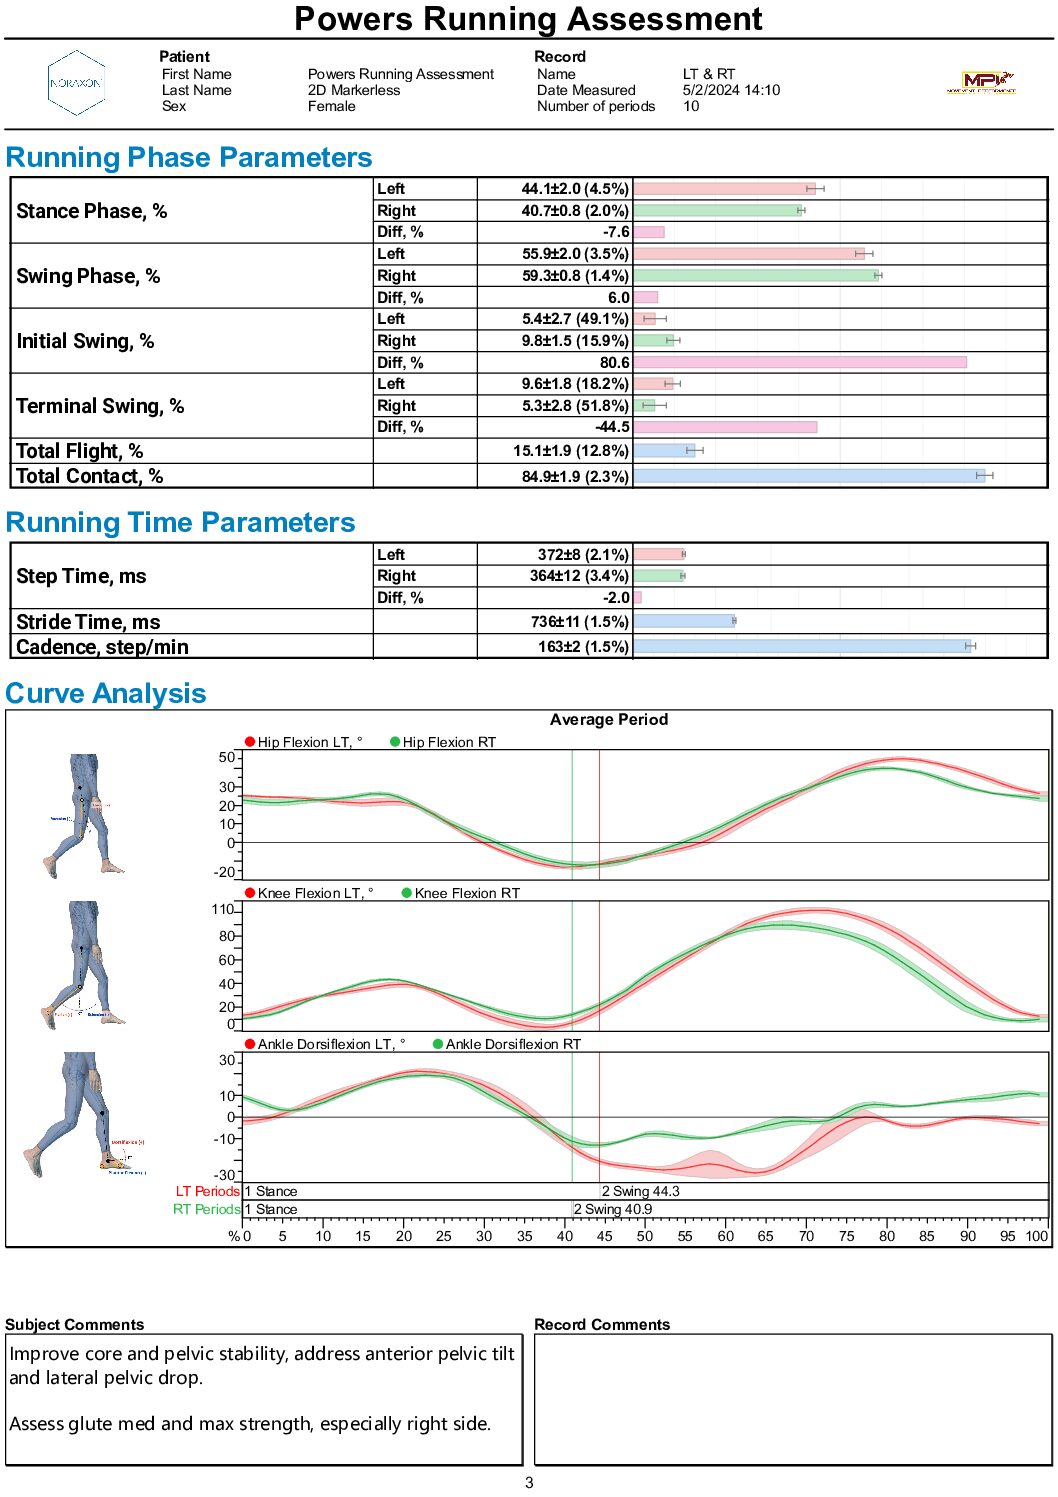
While 2D analysis has limitations in joint angle accuracy and multi-planar movement assessment, its utility in structured workflows should not be overlooked—especially when used with a clear understanding of what it can and cannot measure.
Conclusion
As motion analysis becomes more accessible, it’s critical to understand the capabilities and limitations of the tools we use. While 2D video analysis can offer quick and intuitive feedback, it lacks the anatomical precision needed for accurate kinematic measurement. 3D IMU systems, though more complex, provide segment-relative data that better reflects true joint mechanics.
Visual appearance doesn’t always equal biomechanical reality. By learning to interpret both 2D and 3D data properly—and understanding how joint angles like knee valgus are defined—we can make better decisions in clinical, performance, and research contexts.