

Full Workflow
The video below shows the full workflow for the Powers Return to Sport Assessment. Reference the rest of this guide for quick setup, and reference the full Powers Return to Sport Assessment User Guide for full setup, validation, and troubleshooting.
Clinical Use & Scope
The Powers Return to Sport Assessment helps clinicians evaluate movement quality across multiple athletic tasks rather than relying on a single jump, hop, strength score, or patient-reported outcome measure. Straub & Powers (2025) evaluated six dynamic tasks:
- Step Down
- Drop Jump
- Lateral Shuffle
- Deceleration
- Triple Hop
- Side-Step Cut
Clinical Workflow
Required Hardware
The following hardware is required to perform the Powers RTS Assessment in myoRESEARCH.
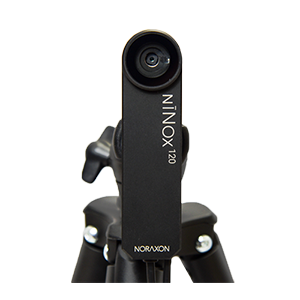
NiNOX cameras
Two NiNOX cameras are required: one to capture the frontal-plane view and one to capture the sagittal-plane view.
Fig. 1
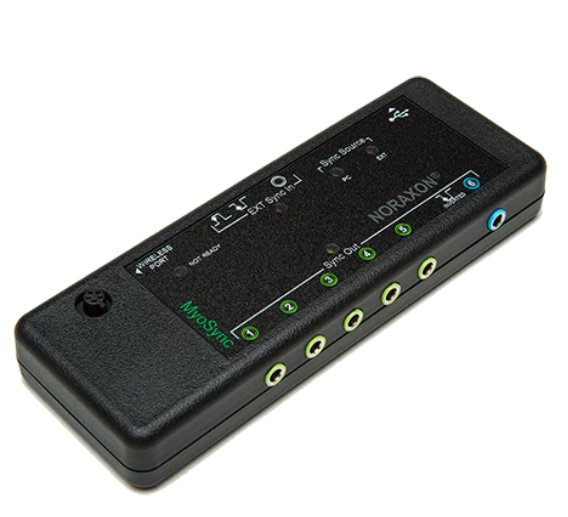
myoSYNC
Synchronizes all devices during measurements.
Fig. 2
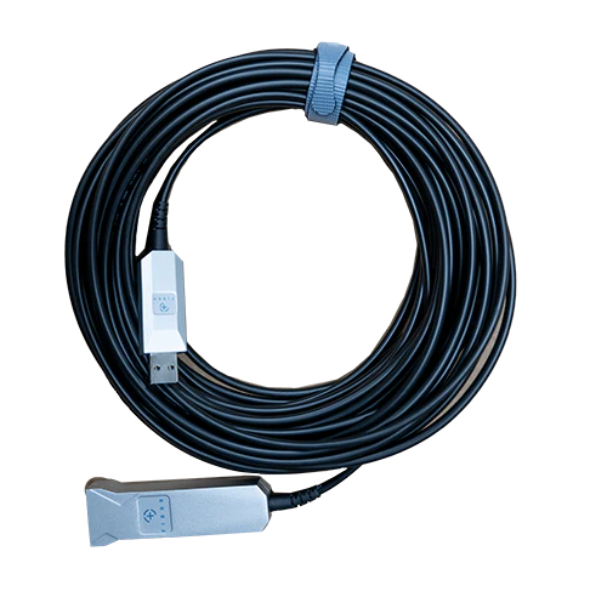
NiNOX extension cables
Extension cables may be required depending on the distance between the cameras and the computer.
Fig. 3
Hardware Connection
Follow the 🔗NiNOX Quick Start Guide to plug in your cameras, detect them in myoRESEARCH, and configure the computer for optimal performance.
Camera and Test-Area Setup
The following recommendations support repeatable camera placement, task setup, valid-trial capture, and documentation. They do not constitute a stand-alone return-to-sport clearance protocol.
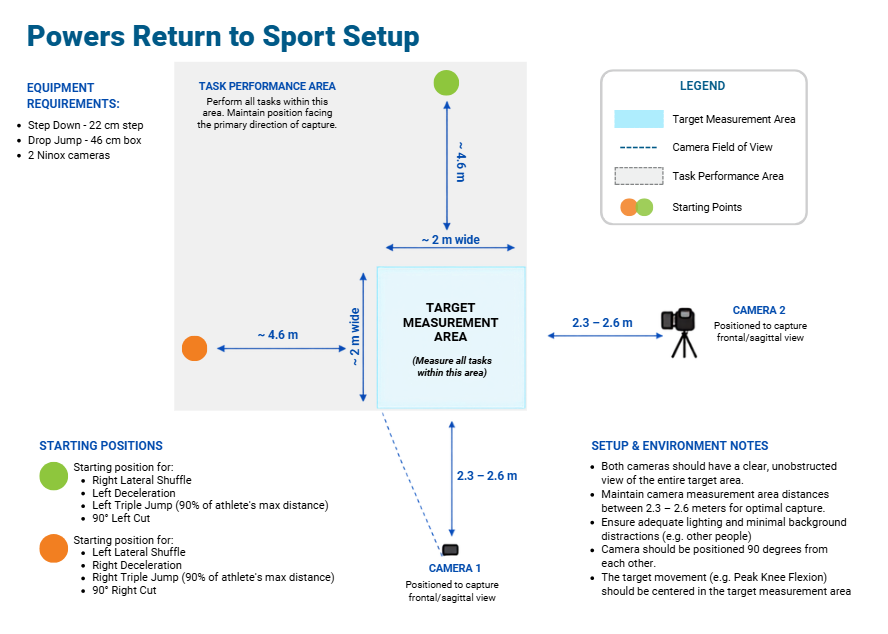
NOTE: For additional details on camera setup and test setup best practices, visit the full Powers Return to Sport Assessment User Guide.
Task Setup and Instructions
NOTE: Capture one recorded repetition of each task. Practice trials may be performed as needed during preparation.
| Task | Setup Requirement | Clinical Instruction | Best-practice note |
|---|---|---|---|
| Step Down | 22 cm step | Lower from the step using the tested limb, tap the opposite heel to the floor, and return to the starting position | Keep the step height fixed and capture the tested limb, trunk, and pelvis. |
| Drop Jump | 46 cm box | Stand on the box, drop to the ground landing with both limbs, then jump as high as possible.
NOTE: Instructing the athlete to jump as quickly as possible often results in a stiffer shock absorption strategy. The athlete should instead be instructed to jump as high as possible, which should result in a better shock absoprtion strategy. |
Avoid a step-down strategy if the intended task is a drop jump. |
| Lateral Shuffle | 4.6 m lateral runway | Shuffle to the side as quickly as possible, fulling loading the plant leg, then shuffle back to return to the start. | The main cameras should remain centered on the scoring/change-of-direction area. |
| Deceleration | 4.6 m runway | Run forward as quickly as possible, fully loading the plant leg, then backpedal to the starting position. | Measure the 4.6 m start line to the center of the plant/recording area. |
| Triple Hop | 90% of individual maximal hop length | Perform three consecutive maximal forward hops on the tested limb and stick the final landing in the recording area. | Do not use the same distance for everyone; determine maximum hop length first. |
| Side-Step Cut | Fixed distance not specified | Run forward as quickly as possible, plant with the tested limb, and make a 90-degree change of direction.
NOTE: Ensure the athlete does not rotate their torso out of plane or round the cut. |
Choose a clinic-standard approach distance, often 4.6 m for consistency, and document it. |
NOTE: For more details on valid trial criteria, visit the full Powers Return to Sport Assessment User Guide.
Pre-Recording Checklist
- Confirm that it is clinically appropriate for the athlete to perform jumping, hopping, deceleration, and cutting tasks.
- Confirm the test surface is clear, flat, and nonslip.
- Mark the center target/plant zone.
- Confirm the 22 cm step and 46 cm drop jump box are available.
- Mark the Deceleration and Lateral Shuffle 4.6 m from the plant zone.
- Determine the Triple Hop start distance. The start distance is individualized at 90% of the athlete’s maximal hop length.
- Confirm the frontal and sagittal cameras are perpendicular to the target.
- Confirm the cameras are in portrait orientation and the full body is visible in the target area.
- Verify synchronization, fps, resolution, focus, lens correction, shutter, and lighting have been checked.
- Review trial validity before changing the setup.
- Practice trials are allowed before recording each task.
- NOTE: Instruct the athlete to keep their head up and eyes looking forward for each task. If the athlete is looking down or to the side, tracking can fail.
Collecting a Trial in myoRESEARCH
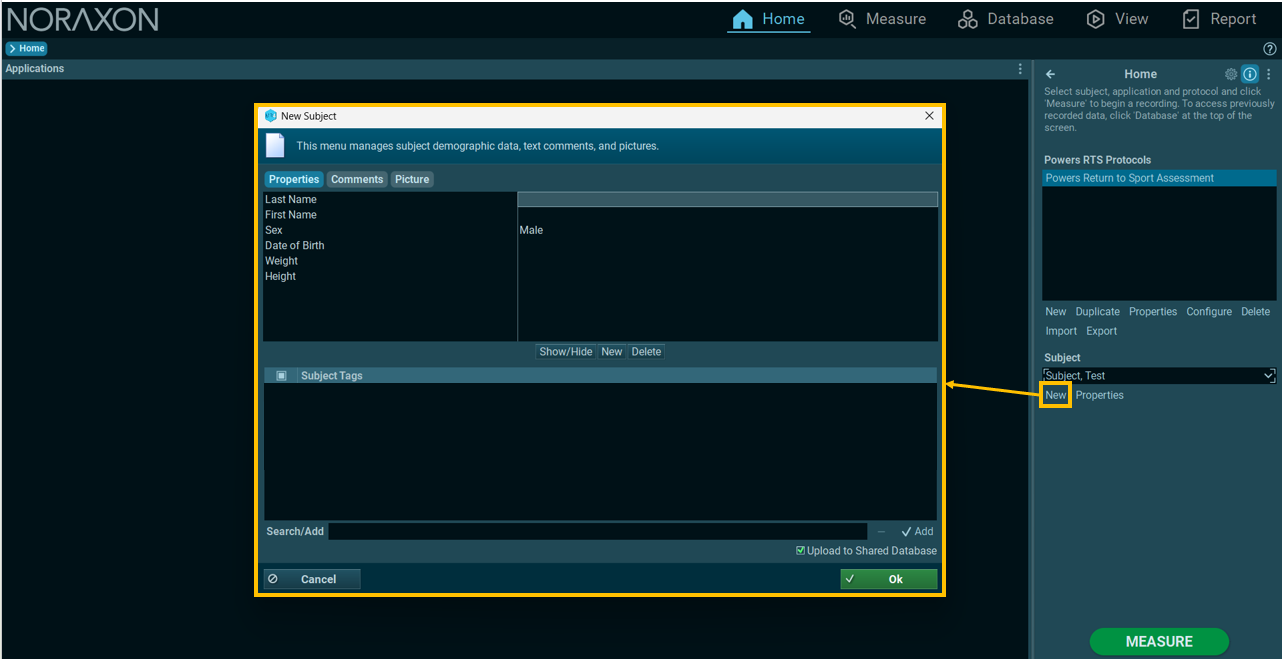
Step 1: Starting from the HOME screen, create a new subject or select the subject from the list.
Step 2: Select the Powers RTS Application, then select the Powers Return to Sport Assessment protocol.
NOTE: If the cameras have not yet been added, open Configuration and add them to the measurement configuration.
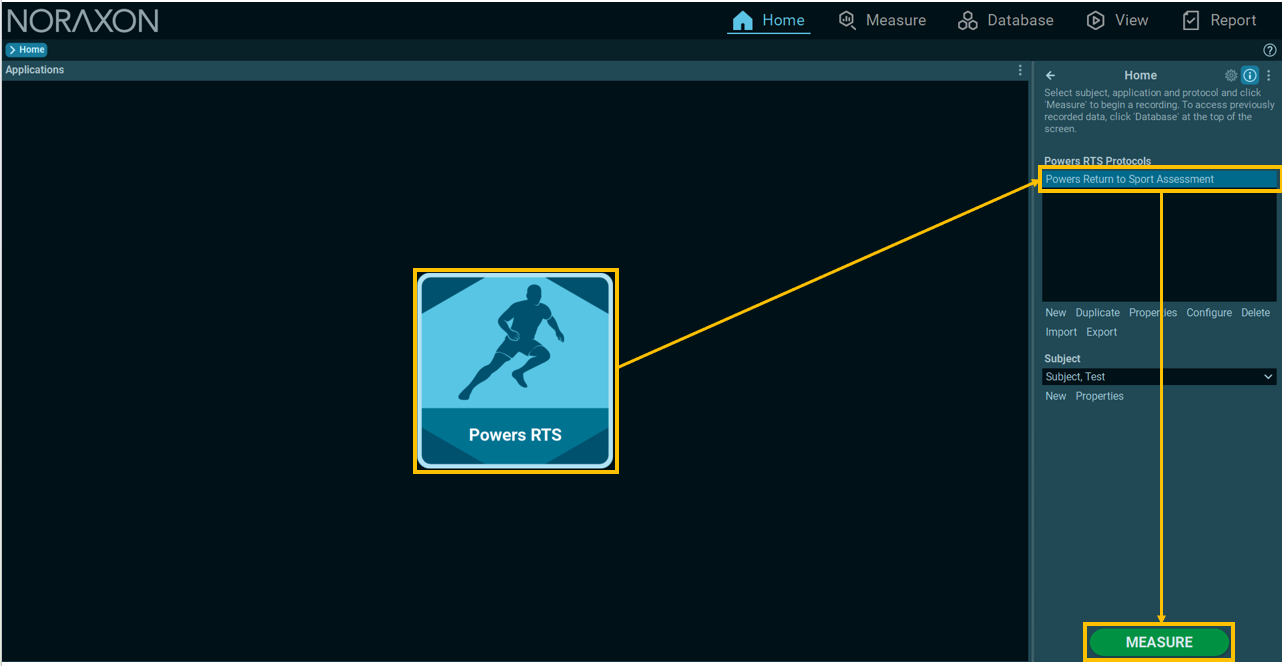
Step 3: Select MEASURE to begin the assessment.
Fig. 6: The video shown below demonstrates the complete recording workflow, including subject setup and task performance.
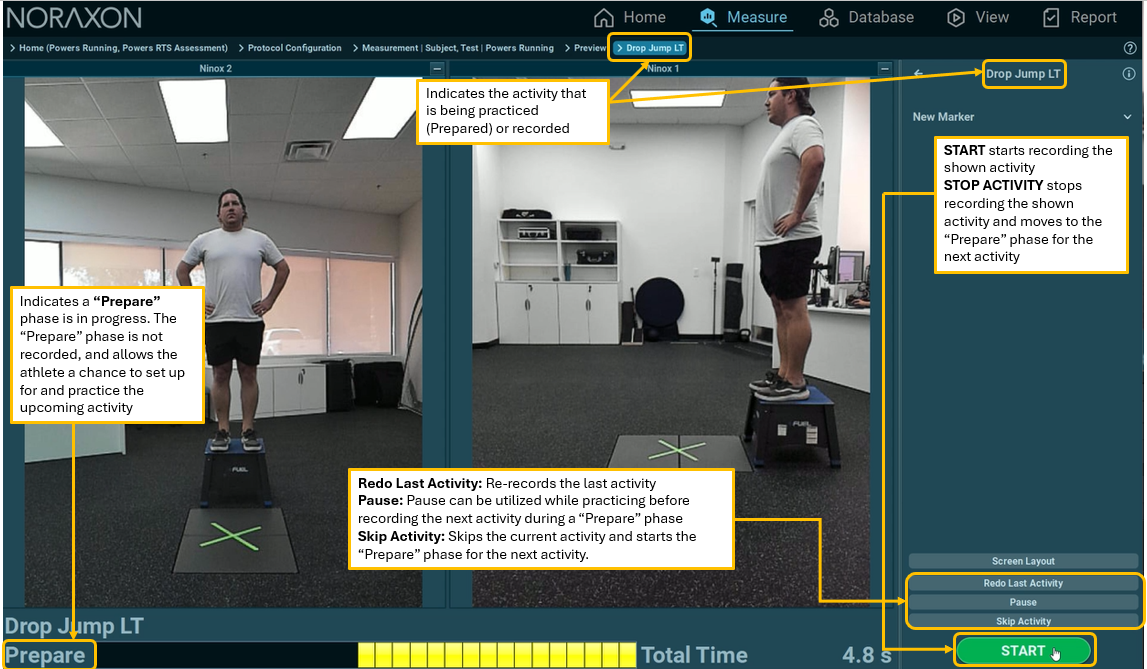
NOTE: Each task should be captured as one recorded repetition. Practice trials may be performed as needed during the “Prepare” phases before the recording phase for that movement starts.
Fig. 7: The diagram below demonstrates the buttons available in MR while recording a full RTS task.
Analyzing Results and Defining RTS Tasks
Step 1: Click REPORT to begin automatic task detection, markerless tracking, and report generation.
myoRESEARCH first attempts to detect each recorded task automatically. Successfully detected tasks are then processed using the 2D Markerless Engine. If one or more tasks cannot be detected, the software prompts the user to define those task intervals manually on the timeline.
NOTE: If automatic detection failed for any tasks, myoRESEARCH will show a message describing the issue and prompt you to define any missing RTS tasks with the Manual Set button.
Fig. 8: The image below shows all the operations available in the Define RTS Tasks step after auto-detection:
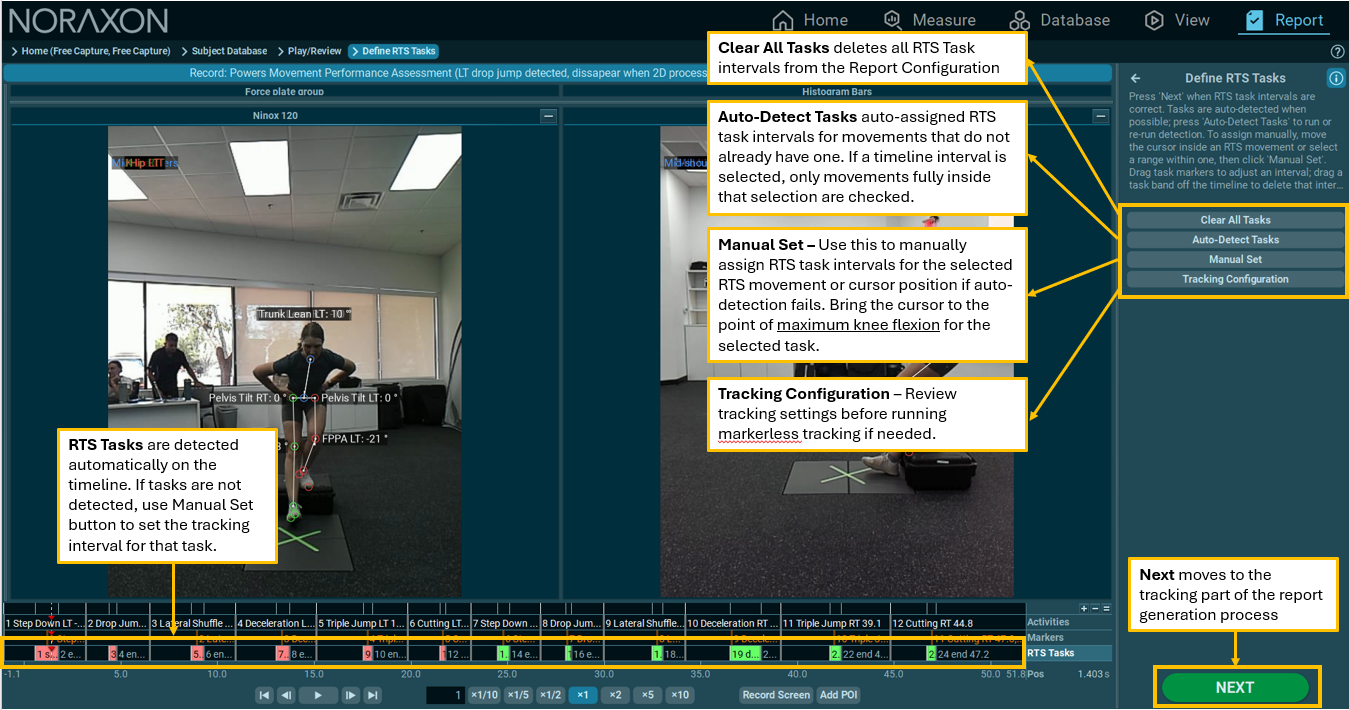
Click NEXT when RTS task intervals are correct.
TIPS:
- Click Auto-Detect Tasks to run or re-run detection.
- To assign a task manually, position the cursor within the recorded movement—or select a range containing the movement—and select Manual Set.
- Drag either edge of a task interval to adjust its duration. Drag the entire task band off the timeline to delete it.
- When Period Drag is enabled, marker movement is constrained by the neighboring markers.
- Select Clear All Tasks to remove all task intervals. If a timeline range is selected, Auto-Detect Tasks and Clear All Tasks affect only the RTS tasks contained entirely within that range.
For additional guidance on defining tasks manually when automatic detection is unsuccessful, and explanations of common detection errors, see sections Common Clinical Questions and Troubleshooting sections Powers Return to Sport Assesment User Guide.
Step 2: Review RTS Points of Interest
At this step, the user should review the following things:
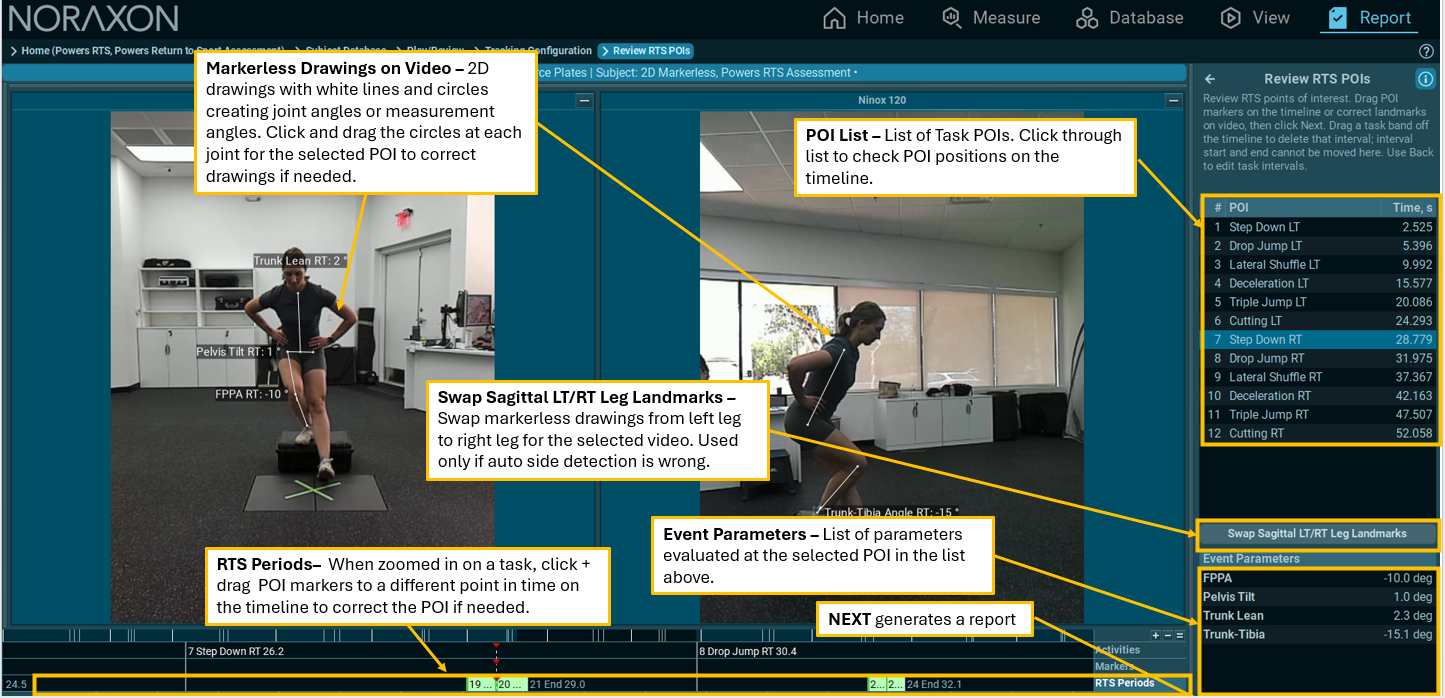
- ✅Select each point of interest (POI) listed on the right and confirm that its marker is positioned at the correct video frame.
- If necessary, drag the corresponding timeline marker to the correct frame within the activity interval.
- NOTE: If the correct POI frame is outside of the detection interval, go back to entend the detection interval in the previous step.
- ✅Confirm that the markerless landmarks and angle drawings are positioned correctly.
- If necessary, drag the white landmarks in the image to correct the automatic landmark assignment.
- ✅If myoRESEARCH displays the opposite limb—for example, left knee flexion instead of right knee flexion—select Swap Sagittal LT/RT Leg Landmarks.
Fig. 10: The image below shows all of the operations available in the Review RTS POIs step.
For more information on reviewing and refining Task POIs, visit the full Powers Return to Sport User Guide.
Step 3: Click NEXT to generate the report.
In the report, you can:
- Review and edit results
- Show/hide movement thresholds
- Show/hide individual movements
- Show/hide drawing labels
For more guideance on making edits to the report, clincal questions the assessment helps answer, specific myoRESEARCH operations, and troubleshooting, visit the full Powers Return to Sport Assessment User Guide.
References and Source Notes
1. Straub RK, Powers CM. Prediction of secondary ACL injury in female athletes using 2D video-based measurements obtained during dynamic tasks: a retrospective case-control study. British Journal of Sports Medicine. 2025;59:1418-1425. DOI: 10.1136/bjsports-2025-109886.
2. Straub RK, Powers CM. Supplemental Material 2: Description of Athletic Tasks Evaluated. British Journal of Sports Medicine. 2025.
3. Noraxon NiNOX Hardware User Manual, P-1448, Rev E/Rev F, 2026. Source for NiNOX 240c and NiNOX 120 frame-rate/resolution options, camera settings, hardware sync, lens correction, focus/shutter guidance, and NiNOX 240c AOV values.