

Clinical Use & Scope
The Powers Return to Sport Assessment helps clinicians evaluate movement quality across multiple athletic tasks rather than relying on a single jump, hop, strength score, or patient-reported outcome measure. Straub & Powers (2025) evaluated six dynamic tasks:
- Step Down
- Drop Jump
- Lateral Shuffle
- Deceleration
- Triple Hop
- Side-Step Cut
The study used two synchronized high-speed cameras recording at 100 frames per second—one positioned for a sagittal-plane view and the other for a frontal-plane view.
The publication does not specify a required camera-to-center distance. In clinical use, the camera setup should therefore be standardized by the clinic and repeated consistently across athletes and follow-up visits. The goal is a clear full-body view at the clinically important frame: peak knee flexion during the landing, deceleration, or plant.
Clinical Workflow
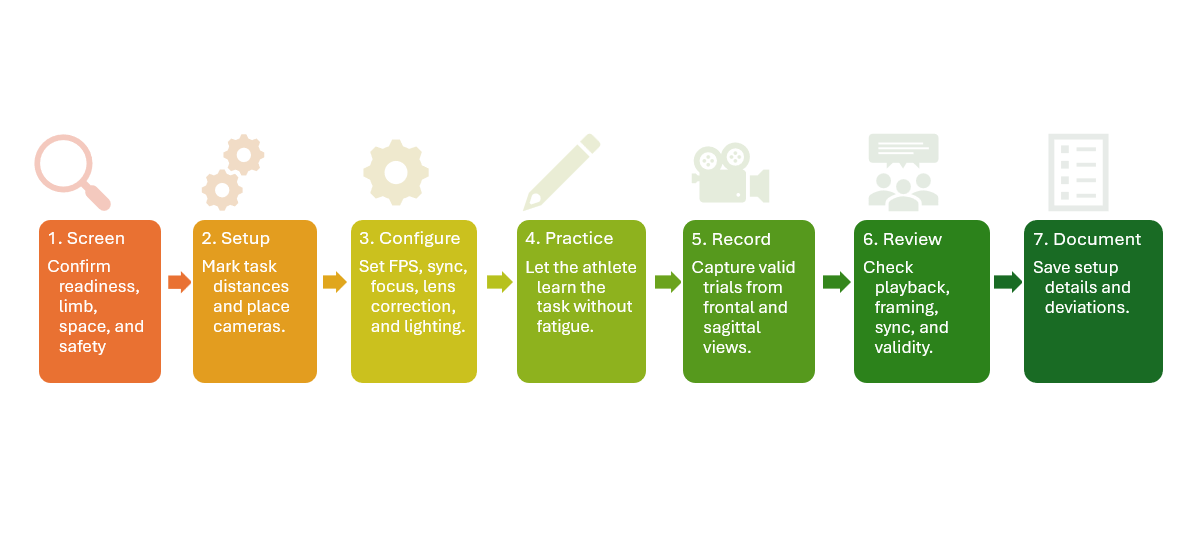
1. Confirm readiness and safety
Confirm the tested limb, surgical history, current restrictions, pain status, footwear, and whether the athlete is cleared to perform jumping, hopping, deceleration, and change-of-direction tasks. Stop or modify testing if pain, instability, unsafe mechanics, or lack of confidence makes the task inappropriate.
2. Prepare the test area
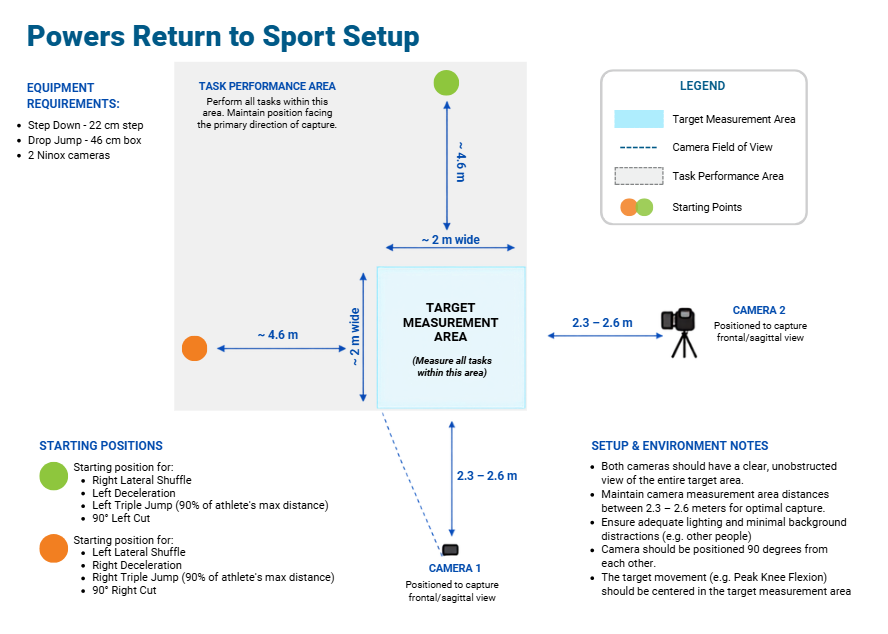
Prepare the test area — Use a flat, nonslip surface with sufficient space for the selected tasks. Mark the center of the force plate or landing/plant target. Measure all task distances to the center of this target—not to the camera or the near edge of the target area.
3. Place and configure cameras
Place one camera for the sagittal view and one camera for the frontal view. Each camera should be perpendicular to its respective plane of motion and centered on the landing or plant target. Physically rotate the cameras into portrait orientation.
4. Perform a quick framing check
Record a short practice trial. Confirm that the full body remains visible during the key landing/plant frame and that the hip, knee, ankle, pelvis, trunk, and foot position are visible enough for review.
5. Capture valid trials
Allow practice trials first. Record trials that match the intended task instructions. Repeat invalid trials while the athlete remains safe and not overly fatigued.
NOTE: Practice trials may be completed as needed, but only one repetition of each task should be captured in the recorded activity.
Having the athlete practice each task at slower speeds to gain confidence and knowledge of how to perform the movement correctly is extremely important to ensure a valid trial is captured for each task.
6. Review immediately
Check playback before moving cameras. Confirm that the trial was saved, both cameras remained synchronized, the athlete was adequately framed, and the trial met the validity criteria.
7. Document the setup
Document camera model, lens if applicable, camera distance, camera/lens height, orientation, frame rate, resolution, task distances, box heights, tested limb, and deviations from the standard clinical workflow.
Required Hardware
The following hardware is required to perform the Powers RTS Assessment in myoRESEARCH.
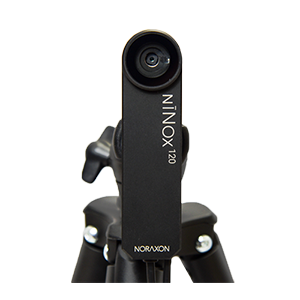
NiNOX cameras
Two NiNOX cameras are required: one to capture the frontal-plane view and one to capture the sagittal-plane view.
Fig. 1
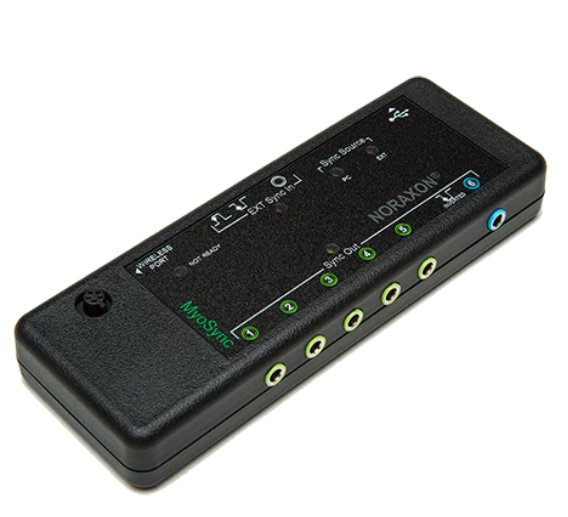
myoSYNC
Synchronizes all devices during measurements.
Fig. 2
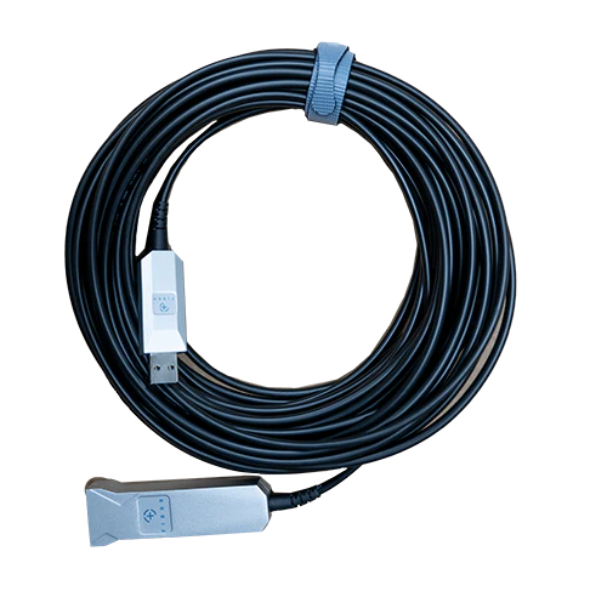
NiNOX extension cables
Extension cables may be required depending on the distance between the cameras and the computer.
Fig. 3
Hardware Connection
Follow the 🔗NiNOX Quick Start Guide to plug in your cameras, detect them in myoRESEARCH, and configure the computer for optimal performance.
Fig. 4: The video below demonstrates how to open Hardware Setup and add the connected cameras.
Camera and Test-Area Setup
The following recommendations support repeatable camera placement, task setup, valid-trial capture, and documentation. They do not constitute a stand-alone return-to-sport clearance protocol.
Key Clinical Recommendation
| Area | Best practice recommendation |
|---|---|
| Primary camera views | Use two synchronized cameras: one frontal view and one sagittal view, both perpendicular to the landing/plant area. |
| Camera framing | Physically rotate cameras into portrait orientation and frame the scoring zone, not the full runway. |
| Target frame | Capture the full athlete around the landing/plant area, typically within a portrait view about 1.8–2.2 m wide and 2.7–3.0 m high. |
| NiNOX 240c setup | Use a 3.5 mm lens, and begin approximately 2.1 m from the center target, with the camera/lens positioned 0.9–1.0 m above the floor. Use 960 x 680 at 120 fps as the default setting. |
| NiNOX 120 setup | Start around 2.4 m from the center point, lens height 0.9–1.0 m, pilot 1920 x 1080 at 60 fps vs 640 x 480 at 120 fps. |
| Task layout | Use published task values where specified: 22 cm step, 46 cm drop-jump box, 4.6 m shuffle/deceleration runway, and 90% individualized triple-hop distance. |
| Clinical documentation | Record camera model, camera distance, height, orientation, fps/resolution, task distances, and any deviations. |
Fig. 5: The diagram below illustrates the recommended test-area and camera arrangement. Suggested camera settings and starting distances are provided in the following sections.
Camera Setup Best Practices
Frame the scoring zone, not the runway
The main clinical cameras should capture the athlete around the landing, plant, or change-of-direction zone. They do not need to capture the full 4.6 m runway. Moving the cameras too far away may make landmarks smaller and reduce the practical value of the video review. If a clinic wants to document the entire runway, use an additional wide reference camera rather than compromising the primary scoring views.
A practical portrait-oriented frame for most clinical settings is approximately 1.8–2.2 m wide by 2.7–3.0 m high. This provides room for normal foot-placement variability while keeping the athlete large enough for clinical review and 2D measurement.
Recommended starting distances
These are starting points, not mandatory protocol distances. Adjust only as needed to keep the full body in frame and maintain sufficient landmark visibility. Once finalized, mark the tripod positions on the floor and use the same setup for repeat visits.
| Camera Setup | Starting distance to center | Lens height | Suggested setting | Clinical note |
|---|---|---|---|---|
| NiNOX 240c, 3.5 mm lens | 2.0–2.3; start around 2.1 m | 0.9–1.0 m | 960 x 680 at 120 fps | Preferred setup for most clinical RTS tasks. Global shutter and good spatial detail. |
| NiNOX 240c, 4.5 mm lens | 2.5–2.8; start around 2.6 m | 0.9–1.0 m | 960 x 680 at 120 fps | Use when working distance is available or a narrower view is preferred. |
| NiNOX 240c, 6 mm lens | 3.2–3.7 m; start around 3.4 m | 0.9–1.0 m | 960 x 680 at 120 fps | Usually less convenient for compact clinical spaces. |
| NiNOX 120 | 2.3–2.6 m; start around 2.4 m | 0.9–1.0 m | Pilot 1920 x 1080 at 60 fps and 640 x 480 at 120 fps | Good alternative when 240c cameras are not available; pilot to confirm image clarity. |
NiNOX Configuration Best Practices
NiNOX 240c
Use the 3.5 mm lens as the default for compact clinical spaces. Select the correct lens in myoRESEARCH so lens correction is applied. Use 960 x 680 at 120 fps for the best balance of video detail and timing. The 720 x 540 at 240 fps setting may be useful for very fast movements, but it provides less image detail for landmark review. Manually focus the lens at the test distance. If motion blur is visible, reduce shutter time and improve lighting before relying on high gain.
NiNOX 120
The NiNOX 120 is a practical option for clinical video capture. Use portrait orientation and start around 2.4 m from the center point. Pilot 1920 x 1080 at 60 fps for landmark clarity and 640 x 480 at 120 fps for higher temporal resolution. If landmarks are hard to see at 640 x 480, use the higher-resolution 60 fps setting. Disable autofocus and manually set focus to the target distance of the key clinical frame.
Synchronization and computer performance
The myoSYNC is required to time-synchronize video feeds and other integrated data streams (e.g., force plates, EMG, IMU). Select Hardware Sync for each synced device. Use USB 3 connections and a computer configured for high-speed video recording. If video freezes or frames are missing, reduce frame rate or resolution, check USB 3 connectivity, avoid overloading the USB controller, and verify computer power/performance settings.
Task Setup and Instructions
NOTE: Capture one recorded repetition of each task. Practice trials may be performed as needed during preparation.
| Task | Setup Requirement | Clinical Instruction | Best-practice note |
|---|---|---|---|
| Step Down | 22 cm step |
With hands on hips, lower from the step using the tested limb, tap the opposite heel to the floor, and return to the starting position |
Keep the step height fixed and capture the tested limb, trunk, and pelvis. |
| Drop Jump | 46 cm box |
Stand on the box with hands on hips, drop to the ground landing with both limbs, then jump as high as possible. NOTE: Instructing the athlete to jump as quickly as possible often results in a stiffer shock absorption strategy. The athlete should instead be instructed to jump as high as possible, which should result in a better shock absoprtion strategy. |
Avoid a step-down strategy if the intended task is a drop jump. |
| Lateral Shuffle | 4.6 m lateral runway | Shuffle to the side as quickly as possible, fully loading the plant leg, then shuffle back to return to the start. | The main cameras should remain centered on the scoring/change-of-direction area. |
| Deceleration | 4.6 m runway | Run forward as quickly as possible, fully loading the plant leg, then backpedal to the starting position. | Measure the 4.6 m start line to the center of the plant/recording area. |
| Triple Hop | 90% of individual maximal hop length | Perform three consecutive maximal forward hops on the tested limb and stick the final landing in the recording area. | Do not use the same distance for everyone; determine maximum hop length first. |
| Side-Step Cut | Fixed distance not specified |
Run forward as quickly as possible, plant with the tested limb, and make a 90-degree change of direction. NOTE: Ensure the athlete does not rotate their torso out of plane or round the cut. |
Choose a clinic-standard approach distance, often 4.6 m for consistency, and document it. |
Valid-Trial Criteria
Define valid- and invalid-trial criteria before testing so all clinicians apply the same standards. The objective is not to require perfect movement quality, but to ensure that each recording represents the intended task and can be interpreted reliably.
General valid-trial criteria
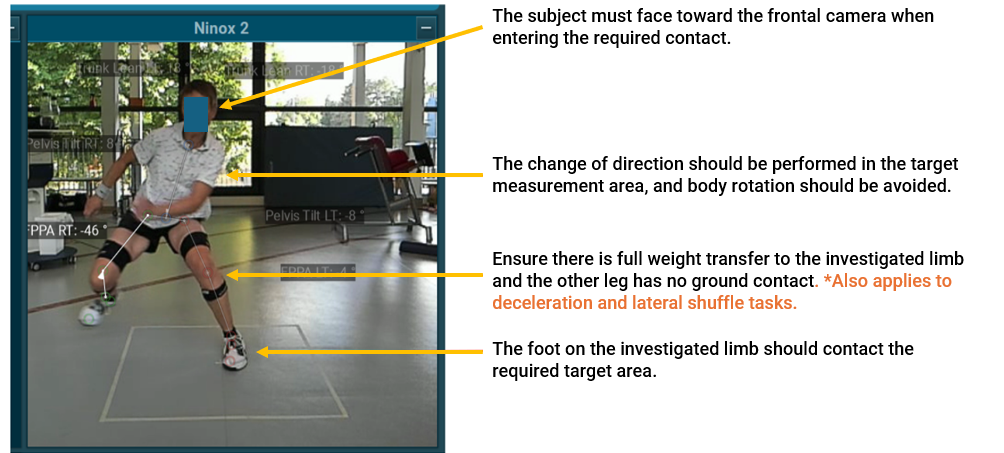
A trial is generally valid when the athlete performs the intended task with the correct limb, lands or plants within the target area, remains visible in both camera views at the clinically important frame, and does not slip, stop unexpectedly, or use a compensatory strategy that materially changes the task.
Fig 6. A representation of a valid trial for the Side-Step Cut task, with an explanation of key features of the point of interest on the investigated limb.
When to repeat a trial
| Task | Repeat a trial if… |
|---|---|
| Triple Hop | The athlete cannot stick the final landing, touches down with the opposite foot or hands, takes an extra hop, misses the target, or lands outside of the recording area. |
| Side-Step Cut | The athlete plants the wrong limb, misses the target, rounds the cut, stutters or stops before the plant, slips, loses balance, or does not make a clear 90-degree change of direction. |
| Drop Jump | The athlete steps down instead of dropping, pauses before jumping, lands outside the target, or leaves the camera frame. |
| Deceleration or Lateral Shuffle | The athlete does not complete the pathway as instructed, stops early, misses the plant/target area, does not load the plant leg, or exits the frame at the critical moment. |
Pre-Recording Checklist
- Confirm that it is clinically appropriate for the athlete to perform jumping, hopping, deceleration, and cutting tasks.
- Confirm the test surface is clear, flat, and nonslip.
- Mark the center target/plant zone.
- Confirm the 22 cm step and 46 cm drop jump box are available.
- Mark the Deceleration and Lateral Shuffle 4.6 m from the plant zone.
- Determine the Triple Hop start distance. The start distance is individualized at 90% of the athlete’s maximal hop length.
- Confirm the frontal and sagittal cameras are perpendicular to the target.
- Confirm the cameras are in portrait orientation and the full body is visible in the target area.
- Verify synchronization, fps, resolution, focus, lens correction, shutter, and lighting have been checked.
- Review trial validity before changing the setup.
- Practice trials are allowed before recording each task.
- NOTE: Instruct the athlete to keep their head up and eyes looking forward for each task. If the athlete is looking down or to the side, tracking can fail.
Collecting a Trial in myoRESEARCH
Step 1: Starting from the HOME screen, create a new subject or select the subject from the list.
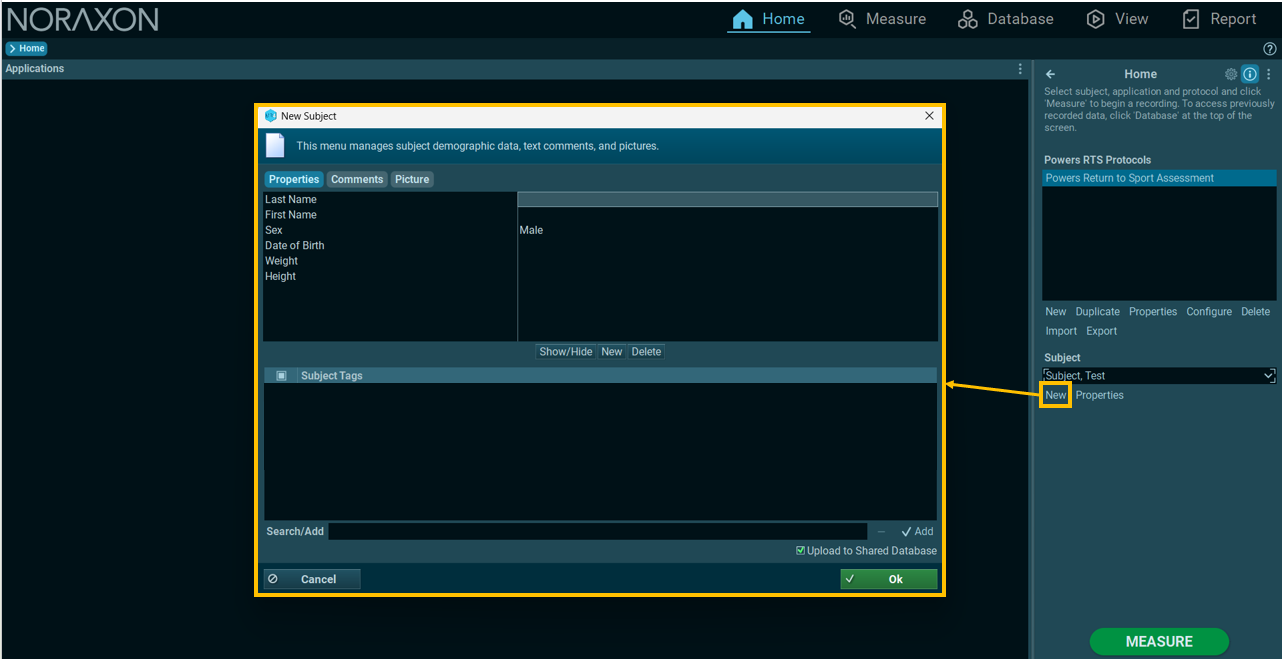
Step 2: Select the Powers RTS Application, then select the Powers Return to Sport Assessment protocol.
NOTE: If the cameras have not yet been added, open Configuration and add them to the measurement configuration.
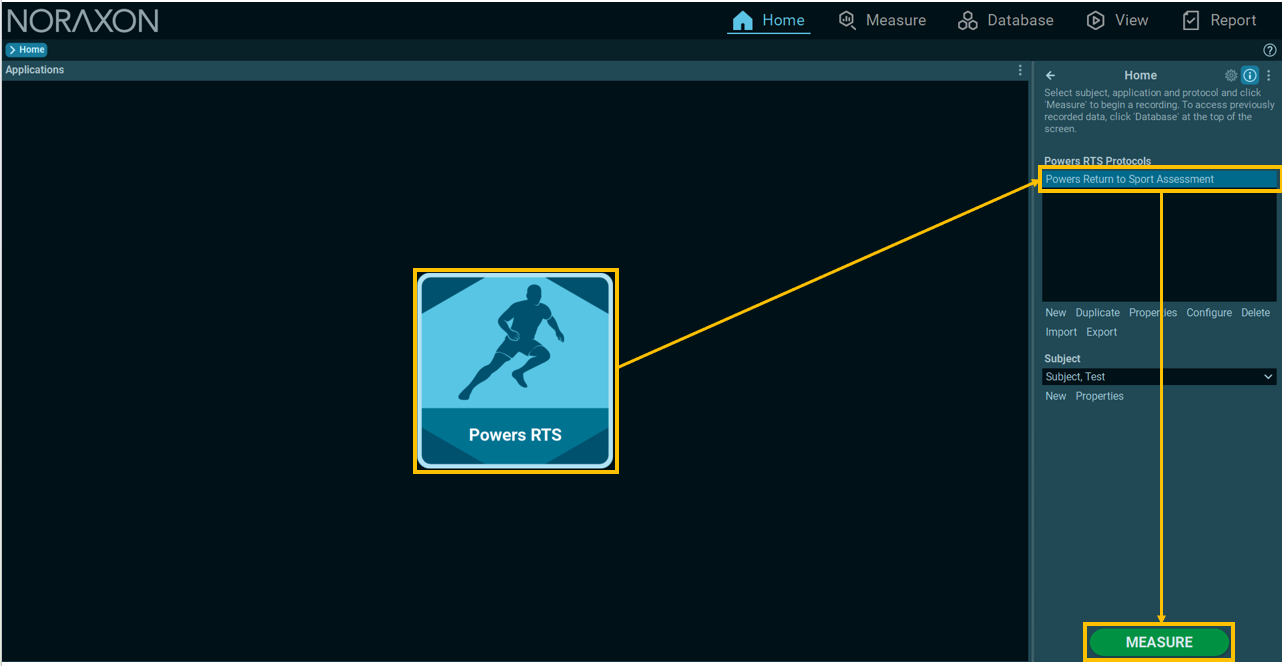
Step 3: Select MEASURE to begin the assessment.
Fig. 6: The video shown below demonstrates the complete recording workflow, including subject setup and task performance.
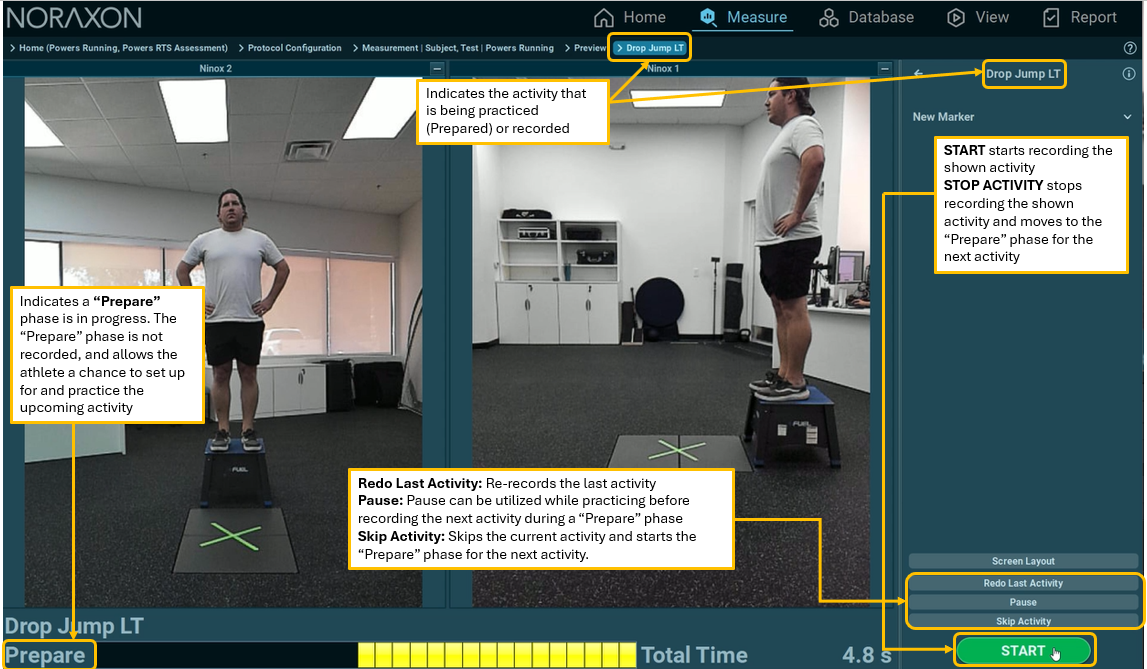
NOTE: Each task should be captured as one recorded repetition. Practice trials may be performed as needed during the “Prepare” phases before the recording phase for that movement starts.
Fig. 7: The diagram below demonstrates the buttons available in MR while recording a full RTS task.
Analyzing Results and Defining RTS Tasks
Step 1: Click REPORT to begin automatic task detection, markerless tracking, and report generation.
myoRESEARCH first attempts to detect each recorded task automatically. Successfully detected tasks are then processed using the 2D Markerless Engine. If one or more tasks cannot be detected, the software prompts the user to define those task intervals manually on the timeline.
NOTE: If automatic detection failed for any tasks, myoRESEARCH will show a message describing the issue and prompt you to define any missing RTS tasks with the Manual Set button.
Fig. 8: The image below shows all the operations available in the Define RTS Tasks step after auto-detection:
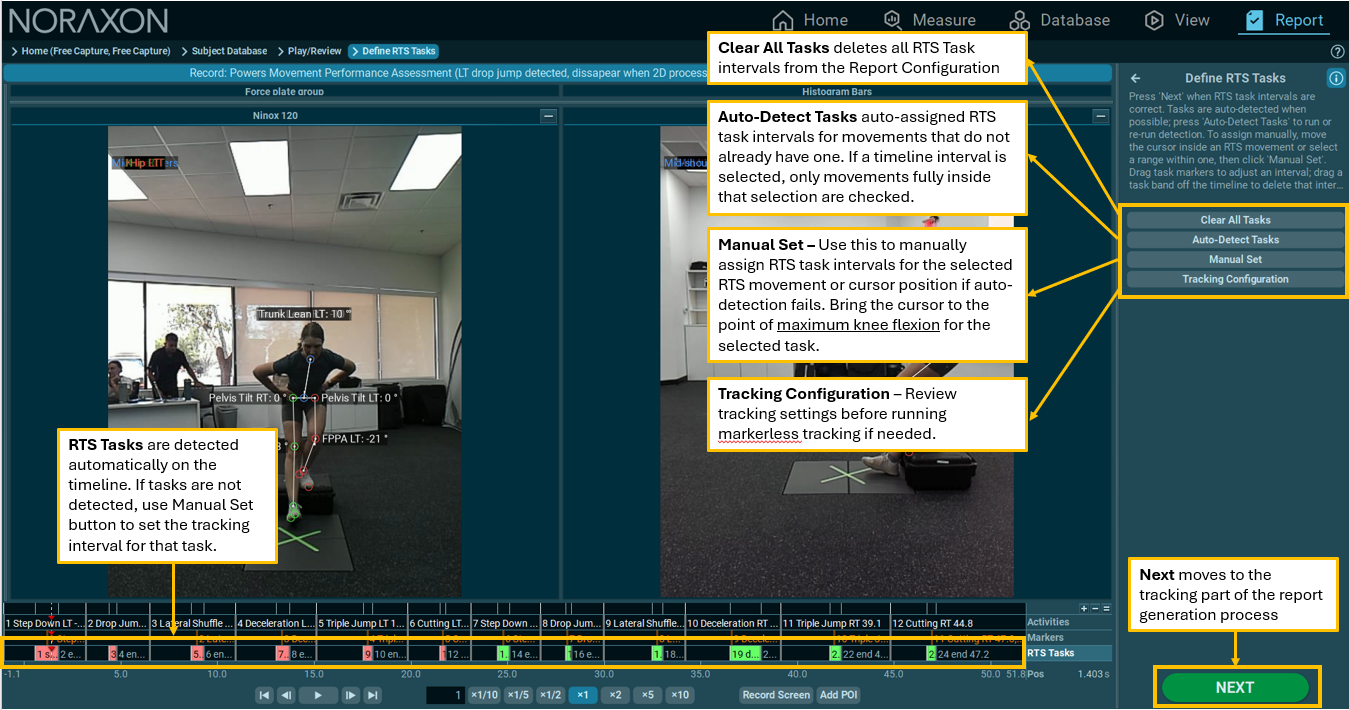
Click NEXT when RTS task intervals are correct.
TIPS:
- Click Auto-Detect Tasks to run or re-run detection.
- To assign a task manually, position the cursor within the recorded movement—or select a range containing the movement—and select Manual Set.
- Drag either edge of a task interval to adjust its duration. Drag the entire task band off the timeline to delete it.
- When Period Drag is enabled, marker movement is constrained by the neighboring markers.
- Select Clear All Tasks to remove all task intervals. If a timeline range is selected, Auto-Detect Tasks and Clear All Tasks affect only the RTS tasks contained entirely within that range.
Fig. 9: The example below demonstrates how to define a task manually when automatic detection is unsuccessful. For explanations of common detection errors, see sections Common Clinical Questions and Troubleshooting.
Step 2: Review RTS Points of Interest.
At this step, the user should review the following things:
- ✅Select each point of interest (POI) listed on the right and confirm that its marker is positioned at the correct video frame.
- If necessary, drag the corresponding timeline marker to the correct frame within the activity interval.
- NOTE: If the correct POI frame is outside of the detection interval, go back to entend the detection interval in the previous step.
- ✅Confirm that the markerless landmarks and angle drawings are positioned correctly.
- If necessary, drag the white landmarks in the image to correct the automatic landmark assignment.
- ✅If myoRESEARCH displays the opposite limb—for example, left knee flexion instead of right knee flexion—select Swap Sagittal LT/RT Leg Landmarks.
Fig. 10: The image below shows all of the operations available in the Review RTS POIs step.
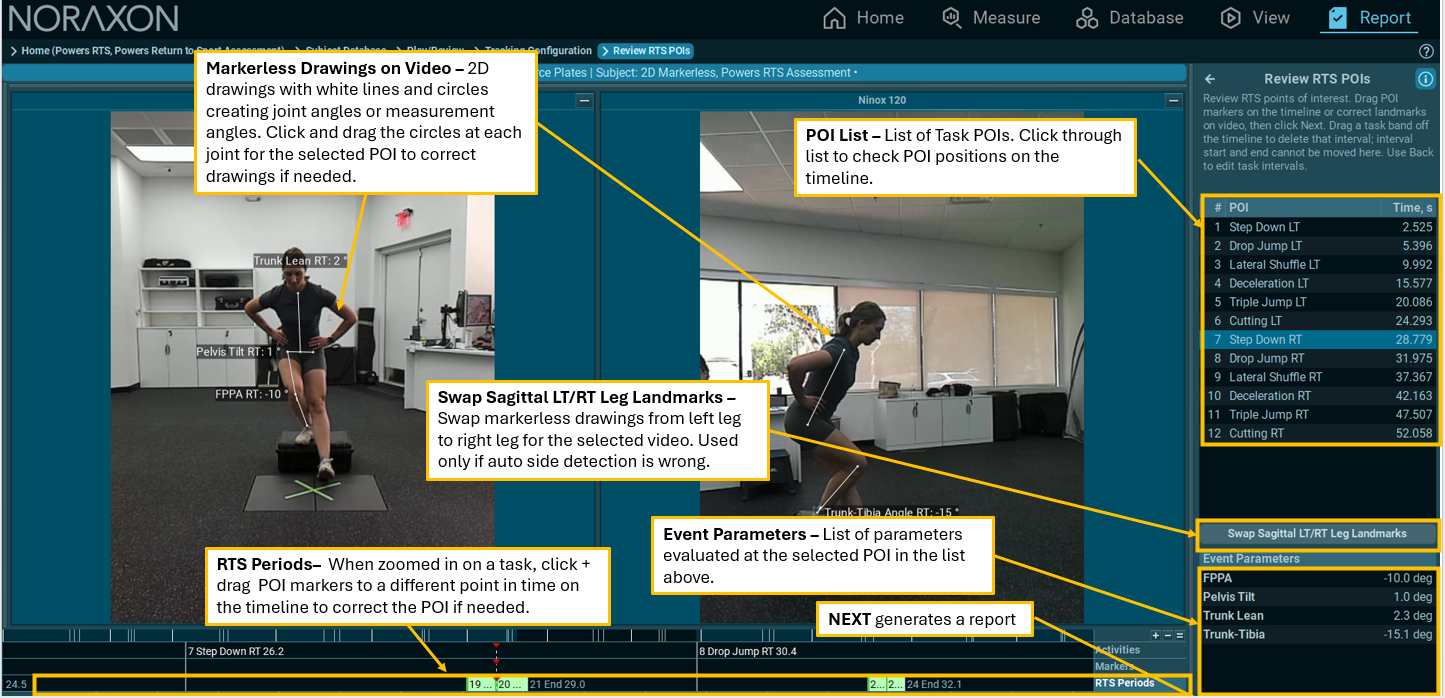
Fig. 11: The video below demonstrates how to review and correct the detected POIs.
Step 3: Click NEXT to generate the report.
In the report, you can:
- Review and edit results
- Show/hide movement thresholds
- Show/hide individual movements
- Show/hide drawing labels
Fig. 12: The video shown below demonstrates how to generate a report and make edits.
Common Clinical Questions
| Question | Best practice answer |
|---|---|
| Is there a required camera distance? | No fixed distance is published. Use a standardized clinical setup that captures the full athlete clearly. Start around 2.1 m with NiNOX 240c/3.5 mm or 2.4 m with NiNOX 120 in portrait orientation and adjust as needed. Refer to the model- and lens-specific starting distance table in this guide. |
| Should the full runway be visible? | Usually no. The primary cameras should frame the landing/plant zone. Add a separate wide camera if full runway documentation is needed. |
| Should the triple-hop distance be the same for everyone? | No. Use 90% of the athlete’s maximum triple-hop length so the final landing occurs in the recording area. |
| Is a balance correction acceptable after the triple hop? | For valid clinical capture, no. If the athlete needs the opposite foot, hands, or an extra hop to regain balance, repeat the trial if safe. |
| What if the athlete cannot safely complete a task? |
Do not force the task. Document that the task was omitted, modified, or not completed, along with the clinical reason. |
| Which camera is preferred? | NiNOX 240c is preferred for fast clinical tasks because of its global shutter and 120/240 fps options. NiNOX 120 can be used when 240c cameras are not available, with pilot testing to confirm image quality. |
myoRESEARCH Operations and Troubleshooting
During capture of the test, it is likely that the athlete will need to redo activities or need additional practice.
Additionally, during report generation, the user may be required to manually define task intervals that couldn’t be determined automatically on the timeline, or make adjustments to the angle drawings.
Answers to the most common questions or issues are detailed below.
Data Capture Issues
Issue: The calculated angles appear incorrect, or task detection is consistently unsuccessful.
Correction: Check the camera placement relative to the task area. The frontal and sagittal cameras should be positioned perpendicular to their respective planes of motion, and the athlete should move primarily within those planes. Avoid oblique or skewed camera views. Use the model- and lens-specific starting distances provided in the Camera Setup table.
Issue: The athlete misses the target during the Triple Hop, Deceleration, or Lateral Shuffle, or the recording ends before the task is completed.
Correction: Treat the attempt as an invalid trial. Select Redo Last Activity and ask the athlete to repeat the task when it is safe to do so.
Tracking or Analysis Issues
Issue: Some events are not detected or tracked.
Correction: When detection fails, MR provides a resolution or suggestion as a pop-up message. Common causes include:
- The athlete moved outside the camera’s field of view.
- The athlete was rotated relative to the frontal or sagittal plane, preventing the software from identifying a valid pose.
- The athlete was not looking straight forward during the each task, which could effect tracking.
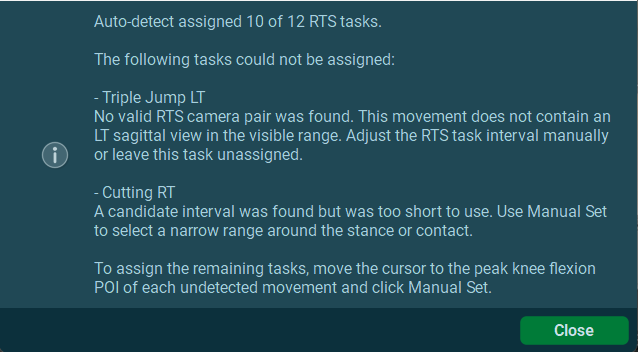
In the event that detection or tracking fails, users should manually set the activity, extend the detection interval if the relevant POI was outside of that interval, or manually adjust the POI location or markerless drawings.
If issues persist, check the best practices in this guide or reach out to Noraxon Support (support@noraxon.com) for guidance.
Issue: MR is crashing during tracking or the tracking is very slow.
Correction: Close other resource-intensive applications before generating the Powers RTS report. Applications that consume substantial CPU, GPU, or system memory may slow tracking or cause myoRESEARCH to close unexpectedly.
Ensure the computer meets Noraxon’s 🔗minimum computer specification requirements.
References and Source Notes
1. Straub RK, Powers CM. Prediction of secondary ACL injury in female athletes using 2D video-based measurements obtained during dynamic tasks: a retrospective case-control study. British Journal of Sports Medicine. 2025;59:1418-1425. DOI: 10.1136/bjsports-2025-109886.
2. Straub RK, Powers CM. Supplemental Material 2: Description of Athletic Tasks Evaluated. British Journal of Sports Medicine. 2025.
3. Noraxon NiNOX Hardware User Manual, P-1448, Rev E/Rev F, 2026. Source for NiNOX 240c and NiNOX 120 frame-rate/resolution options, camera settings, hardware sync, lens correction, focus/shutter guidance, and NiNOX 240c AOV values.