Overview
Accurate calibration is the foundation of any reliable motion capture session. When using IMU sensors for upper-body or partial-body setups, it’s important to understand how each calibration method aligns with your specific application and how to adapt the process when only a subset of sensors is used.
This article explains how to select and apply the appropriate calibration method for your setup, outlines the required initial conditions and postures, and provides guidance for modifying calibration routines when working with limited sensor configurations or reduced mobility scenarios.
By the end of this guide, you’ll understand how to:
- Identify which calibration method is best suited for your application
- Meet the correct initial posture and joint angle requirements
- Adjust calibration for upper-body or other partial-body configurations
- Apply calibration options effectively in mobility assessment workflows
- Recognize and resolve common calibration issues
Which Calibration Method Should I Use?
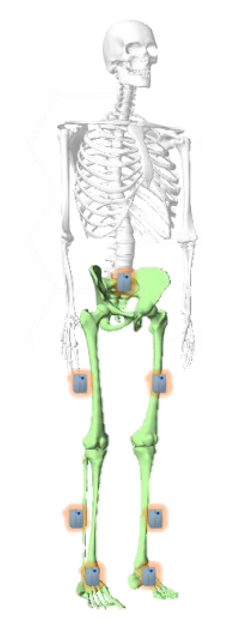
Lower body config – Minimum required for walking Calibration.
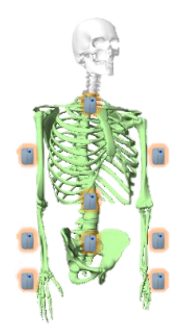
Example of possible partial body setup on the upper body without the head
Calibration Method Cheat Sheet
Recommended calibration methods are listed for the following common measurement scenarios. If you don’t see your measurement scenario here, contact Noraxon Support (support@noraxon.com) for specific calibration advice related to your application.
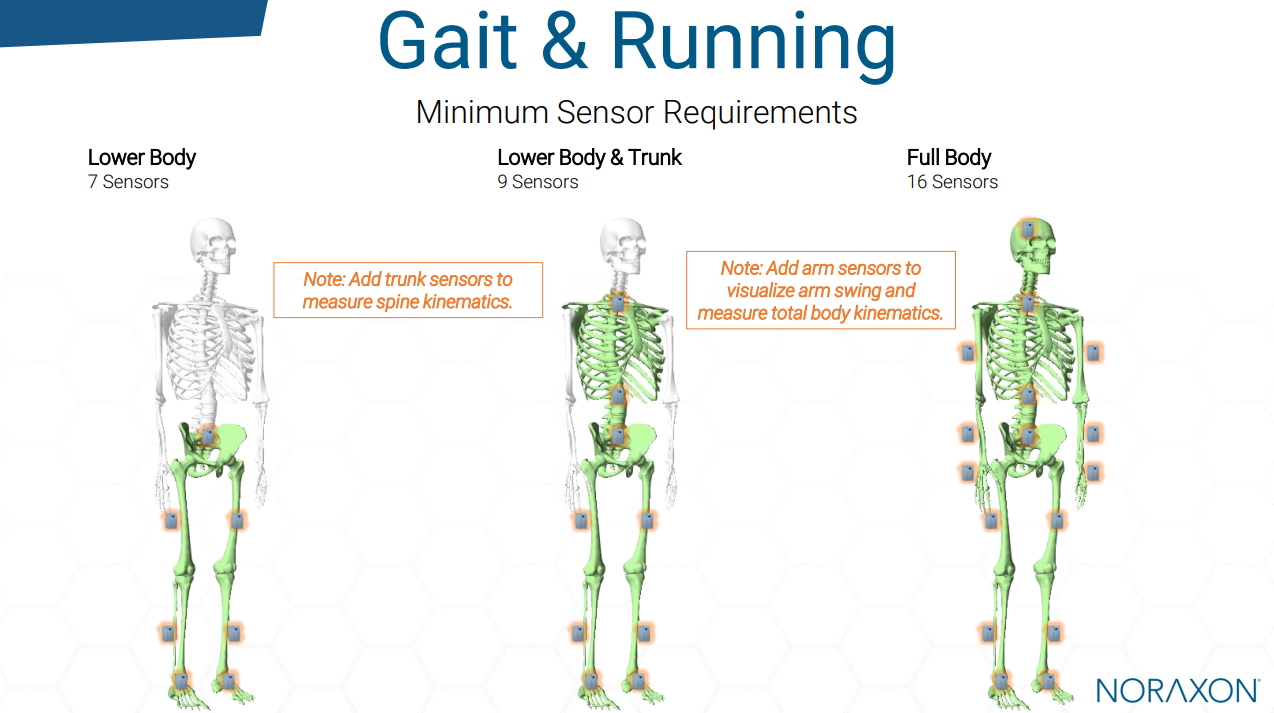
Calibration method for Gait & Running Applications: Walking Calibration
NOTE: For situations where there is minimal space available (e.g., in a small area with a treadmill), the Forward Lean Calibration method can be used.
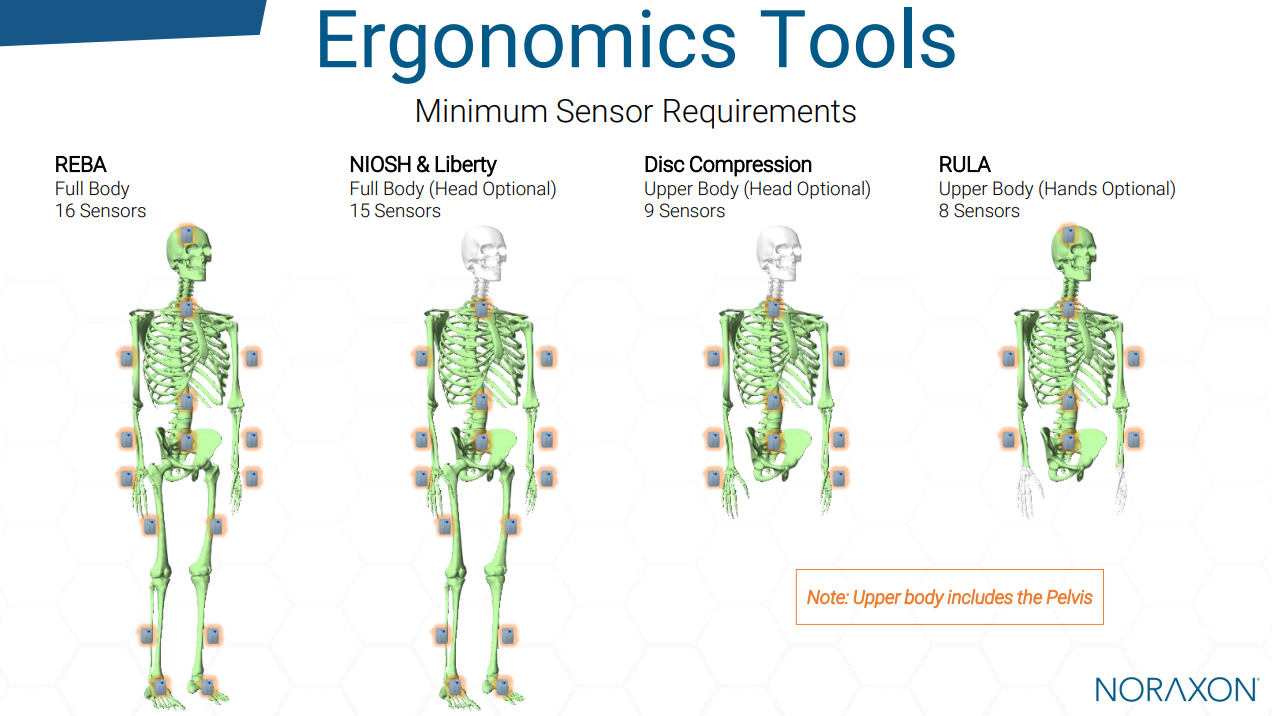
Full Body: Walking Calibration
Full Body: Walking Calibration
Upper body (no head): Forward Lean Calibration
Upper Body (no hands): Walking Calibration
Mobility Assessments
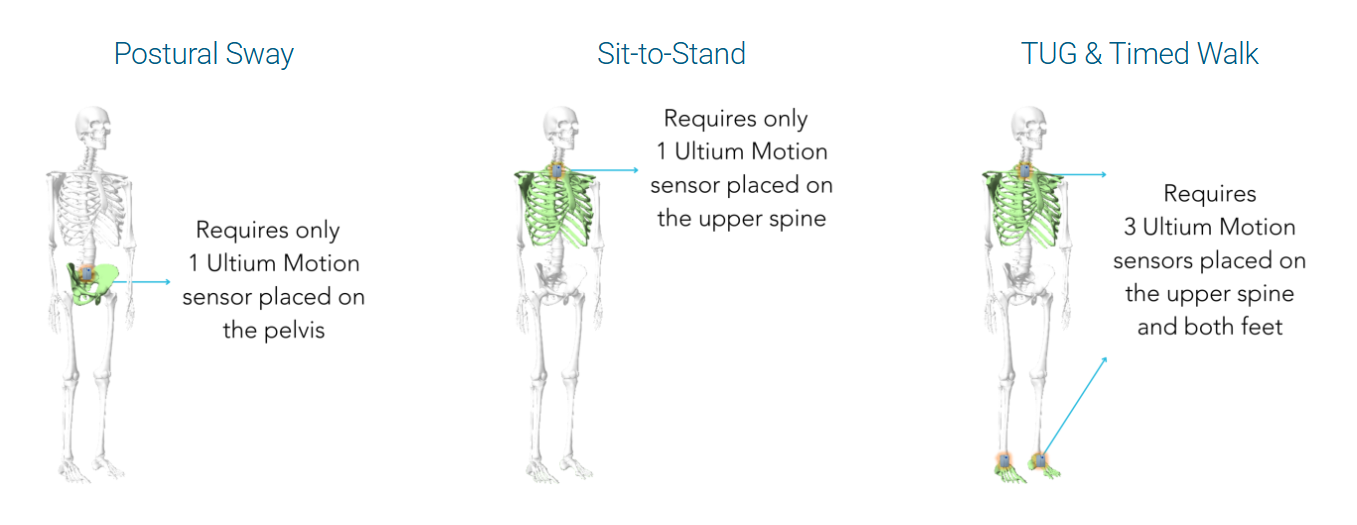
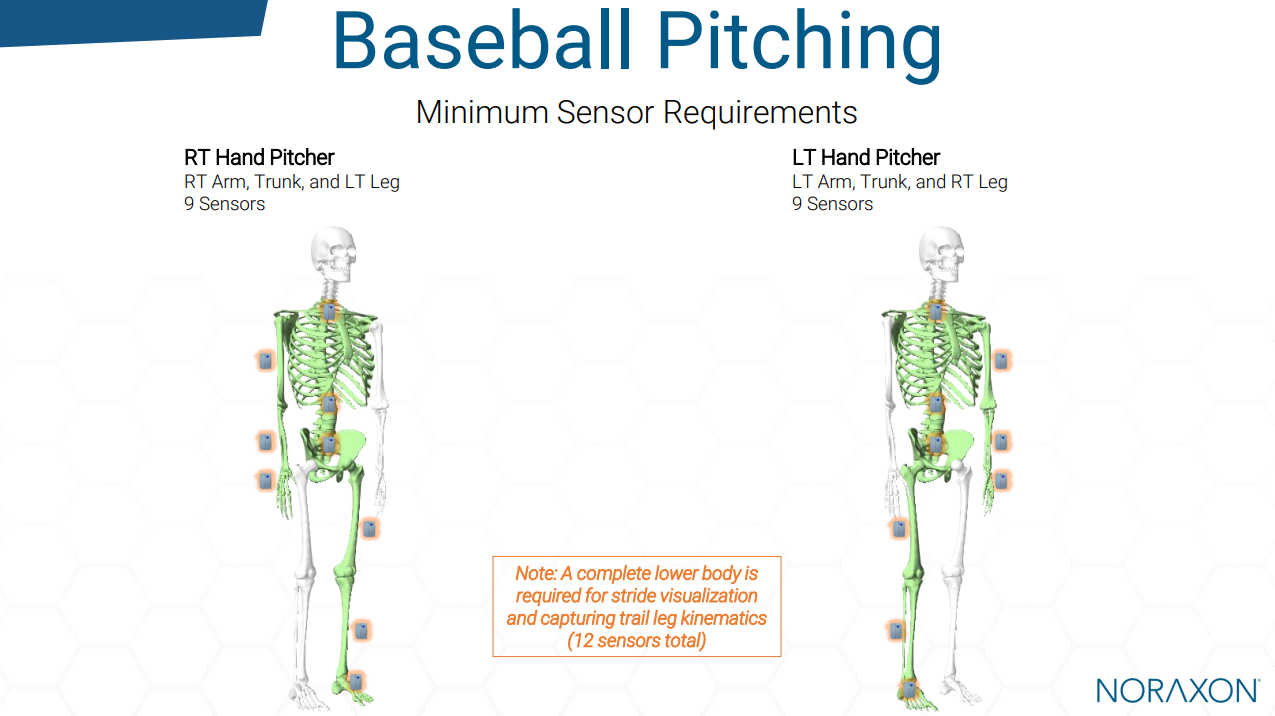
Single-side opposite limb testing: Forward Lean or Multipose
Note: Many users opt to place additional sensors on the opposite lower limb for full lower body analysis with baseball pitching, which means the Walking Calibration can be used.
Understanding Calibration Requirements For Posture-Based Calibration Routines
Standing Pose
While the Standing Pose is just a part of each calibration method, it is important to consider the assumed position of each body segment during this posture for an accurate calibration.
During the Standing Pose, the MR software makes assumptions about the starting joint angle postions of the subject. Any devitation from this starting position will result in offsets throughout the rest of the measurement, so it is important to ensure the initial position is accurate.
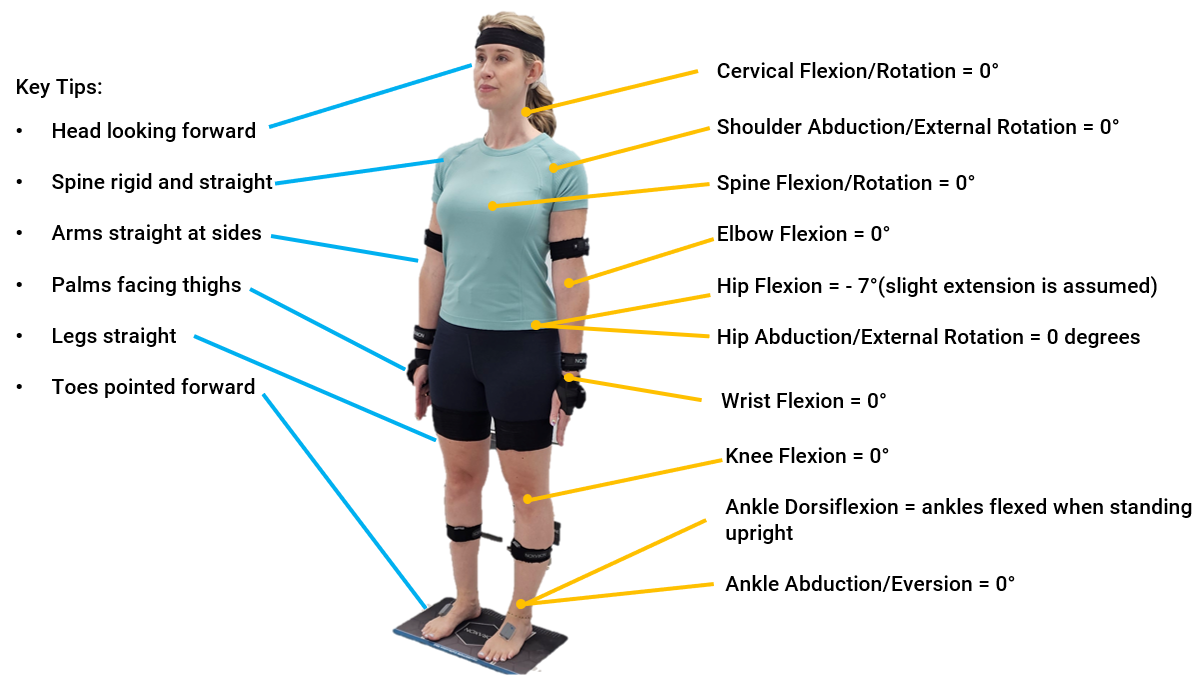
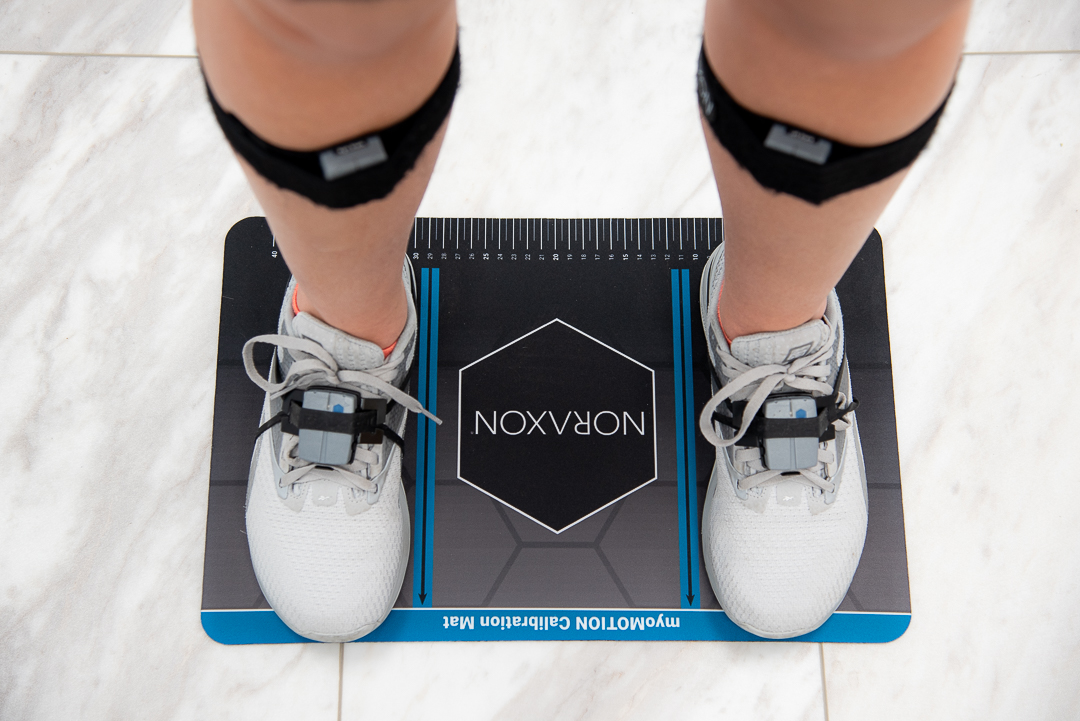
It is recommended to use the Calibration Mat to help the participant maintain a forward and standard foot postition during the calibration.
- If the feet are externally rotated, this can result in offsets in Hip External Rotation.
- If the feet are too close or too far apart, this can result in offsets in Hip Adduction/Abduction.
Forward Lean Calibration
The Forward Lean Calibration consistes of the 3 poses shown below:
- Standing Pose
- A-Frame Pose
- Forward Lean Pose
While all segments/sensors used for the measurement are calibrated during the Standing Pose, the A-Frame Pose and Forward Lean Pose are designed to calibrate specific segments. This means that the participant doesn’t need to worry about what other body parts not calibrated during that pose are doing.
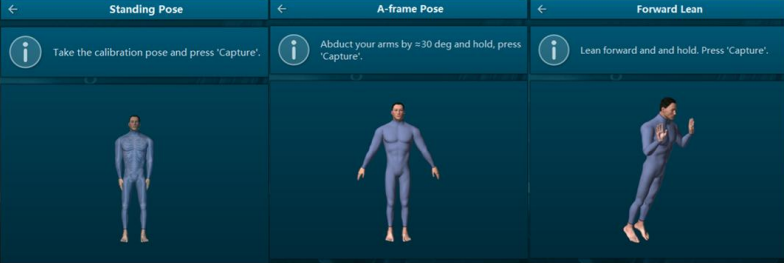
Standing Pose:
Assumes all measured segments are in the position shown above.
Software assumptions for neutral/rigid during this posture are listed in the section titled “Standing Pose”
Segments without sensors on them are not requried to be in the pictured “Standing Pose,” which means the subject can be seated for upper body calibrations, as long as the lower body doesn’t have sensors on them. See the full tutorials included in the Mobility Assessments for specific instructions for the Standing Pose in each of these setups.
A-Frame Pose:
Calibrates only the arm segments:
- RT/LT Upper Arm
- RT/LT Forearm
- RT/LT Hand
Software assumes the arm segments are abducted at least 30 degrees from the initial position (Standing Pose).
This step will be skipped if arm sensors are not used in the measurement.
Forward Lean Pose:
Calibrates all segments except for the arms:
- Head
- Upper Spine
- Lower Spine
- Pelvis
- RT/LT Thigh
- RT/LT Shank
- RT/LT Foot
Software assumes the above segments are tilted forward at least 30 degrees from the initial position (Standing Pose).
Pro Tip: If using foot sensors, the heels must be raised during this pose.
Multipose Calibration
Note that enabling the Multipose Calibration requires enabling Advanced Calibration Modes in the Software Setup.
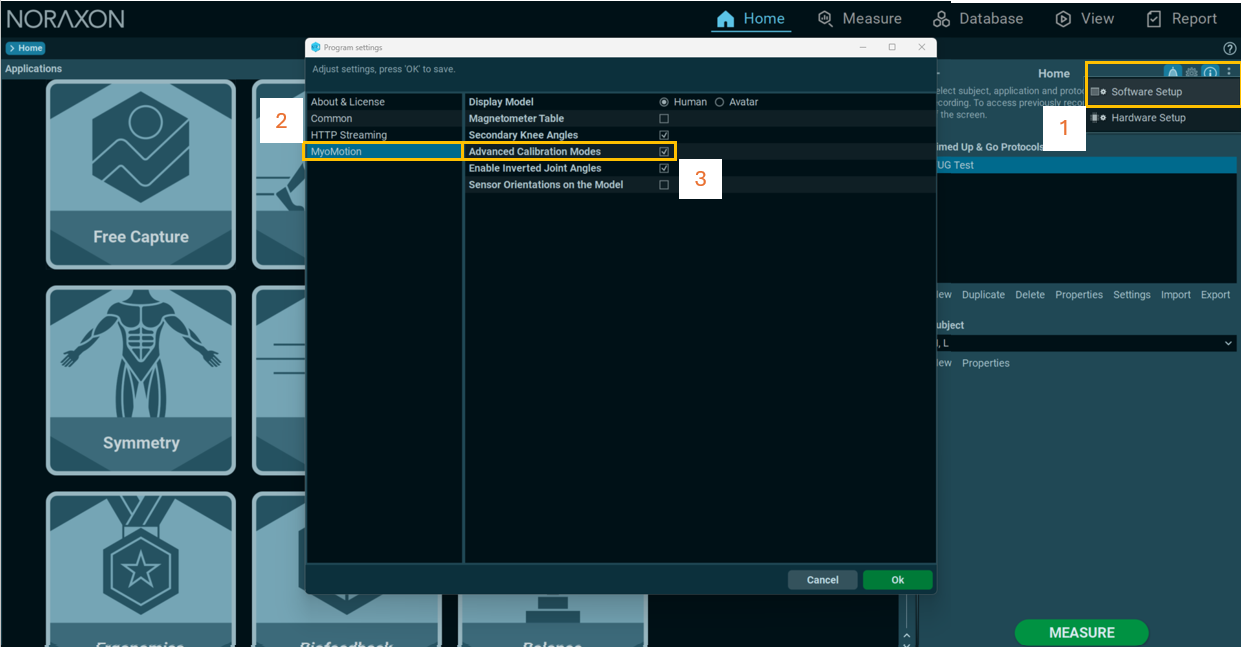
The Multipose Calibration consistes of the 4 poses shown below:
- Standing Pose
- Bowing Pose
- Left Leg Pose/Right Leg Pose
- A-Frame Pose
While all segments/sensors used for the measurement are calibrated during the Standing Pose, the A-Frame Pose, Bowing Pose, Left Leg Pose, and Right Leg Pose are designed to calibrate specific segments. This means that the participant doesn’t need to worry about what other body parts not calibrated during that pose are doing.

Standing Pose:
Assumes all measured segments are in the position shown above.
Software assumptions for neutral/rigid during this posture are listed in the section titled “Standing Pose”
Segments without sensors on them are not requried to be in the pictured “Standing Pose,” which means the subject can be seated for upper body calibrations, as long as the lower body doesn’t have sensors on them. See the full tutorials included in the Mobility Assessments for specific instructions for the Standing Pose in each of these setups.
Bowing Pose:
Calibrates spine (including pelvis) and head segments
- Head
- Upper Spine
- Lower Spine
- Pelvis
Software assumes the above segments are tilted forward at least 30 degrees from the initial position (Standing Pose).
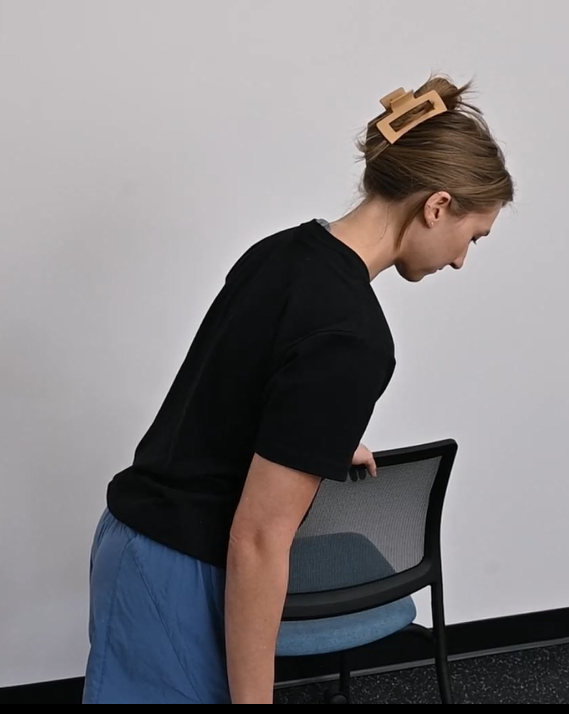
Pro Tip: This pose can be done assisted by leaning over a chair if desired, as long as the participant maintains a flat back. The head must not be flexed or extended, and the subject should maintain a straight spine when all segments are used.
Left Leg Pose and Right Leg Pose:
Calibrates the leg segments.
Left Leg Pose:
- LT Thigh
- LT Shank
- LT Foot
Right Leg Pose:
- RT Thigh
- RT Shank
- RT Foot
The subject’s left leg or right leg should be raised by ~30-degrees while keeping the ankle flexed. The rest of the body segments with sensors on them should remain in the Standing Pose.
This step will be skipped if left leg or right leg sensors are not used in the measurement.
A-Frame Pose:
Calibrates only the arm segments:
- RT/LT Upper Arm
- RT/LT Forearm
- RT/LT Hand
Software assumes the arm segments are abducted at least 30 degrees from the initial position (Standing Pose).
This step will be skipped if arm sensors are not used in the measurement.
Applying Calibration Requirements to Partial-Body Setups
Modifying the calibration positioning required in partial-body setups can be confusing. A good rule of thumb to consider is that when sensors/segments are unused in the measurement, it is not necessary for that limb to be a part of the calibration procedure. In this case, those segments can be in whatever position the user desires, as long as the segments being captured are in the expected position and the initial joint angles are in the expected range.
Example: Upper Body Only Calibration with Limited Lower Body Mobility
When collecting data on the upper body segments only, whether the lower body is simply not used or the participant is wheelchair bound and cannot move their lower body into the expected position defined in the Forward Lean calibration tutorial, the Standing Pose portion of the calibration can be performed in the sitting position, as long as the segments with sensors on them are in the expected position.
During the Standing Pose, the MR software makes assumptions about the starting position of the subject, as mentioned above. If there are no sensors on the lower body below the Pelvis, none of the requirements listed below the Pelvis apply. Therefore, the subject can be seated during the “Standing Pose” calibration as long as the spine, head, and arm segements with sensors on them are in the proper position.
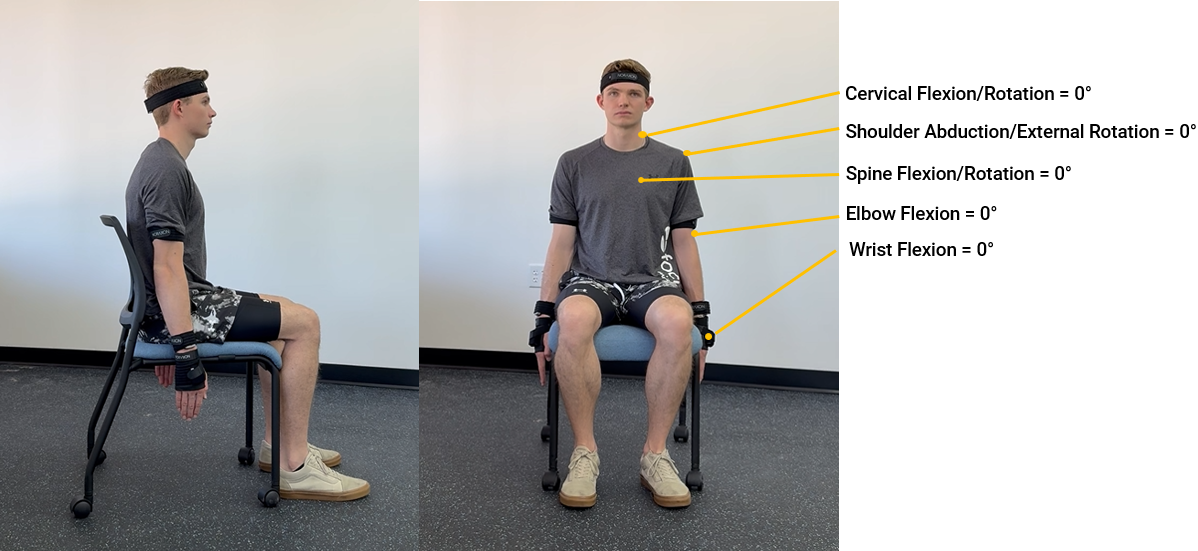
Below, the subject wearing sensors on the arms, spine (Upper Spine, Lower Spine, and Pelvis), and head maintains the “Standing Pose” in a seated position with a straight spine and straight arms. The initial calibration requirements listed in the Standing Pose section apply only to the Upper Body (spine, arms, and head). We don’t care about what is going on with the legs and feet!
Note: If the subject is in a chair that does not allow the arms to straighten at the sides (e.g. they are in a wheelchair), and measuring arm angles is desired, then the subject should perform the calibration in a chair that allows them to straighten their arms, then move to the other chair for measurement.
When the Forward Lean Calibration is used without lower body sensors, the other calibration poses would therefore look like below.

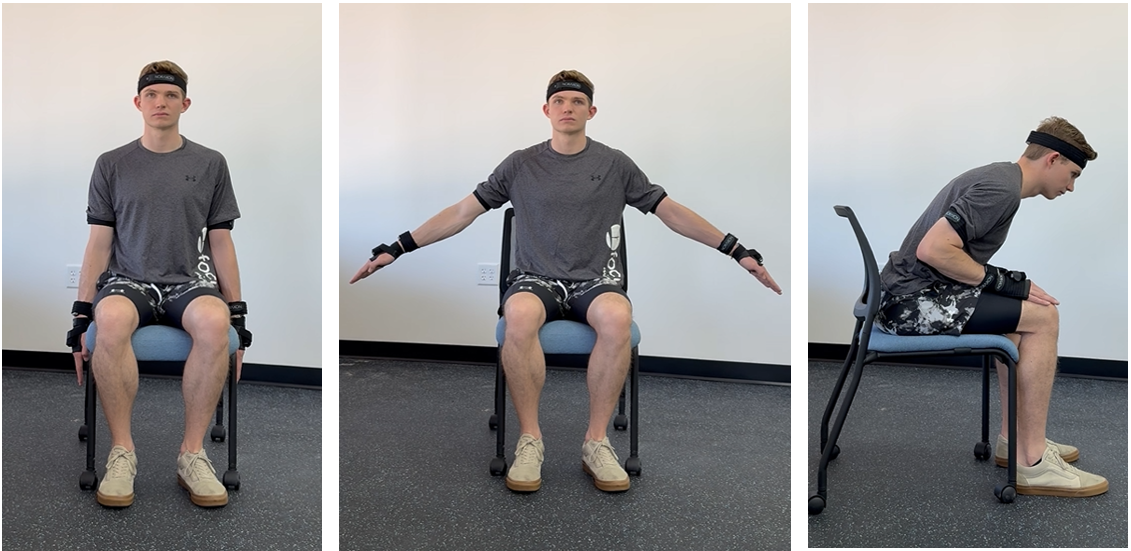
Standing Pose:
- Arms straight at the sides
- Spine Straight
- Pelvis neutral
- Head pointed forward
A-Frame Pose
- Arms abducted away from the body by around 3 degrees.
This step will be skipped if arm sensors are not used in the measurement.
Forward Lean Pose:
- Spine and head tilted forward about 30 degrees from the initial position.
- Arm position doesn’t matter, so the subject can use hands/arms as leverage or for stability.
Calibration Postures for Limited Mobility – Mobility Assessments
When using the Mobility Assessment workflows that include just the Pelvis, Upper Spine, and/or feet sensors, there are even fewer restrictions when it comes to calibration methods.
For the full Mobility Assessments Suite tutorials, check out the 🔗Mobilty Assessment Tutorials section of the Knowledge Base.
Let’s take the Timed Walk (10MWT) test as an example. The full calibration is shown in the video below. However, there are some additional considerations that could be made to ensure the calibration is fully possible for individuals with poor mobility or stability.
Left/Right Leg Pose Considerations
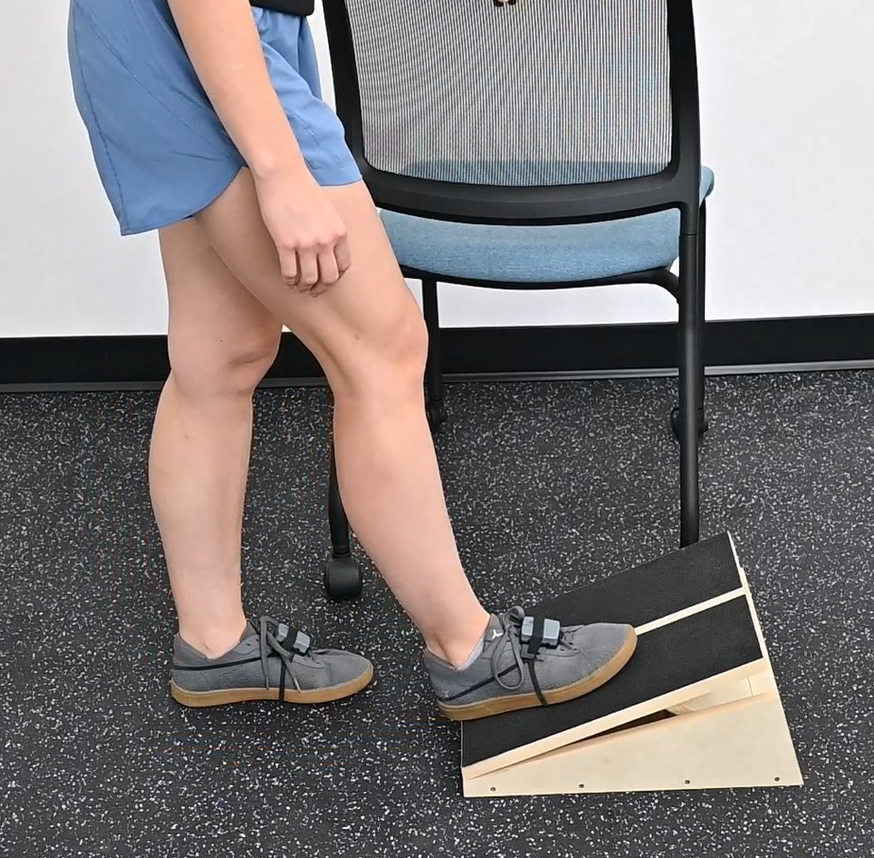
If the subject has a hard time manually dorsiflexing their foot for the Left Leg Pose and Right Leg Pose, a slant board can be used to provide assistance.
The only requirement for this pose is that the Foot Sensor should be tilted up (dorsiflexed) from the Standing Pose upright position.

Bowing Pose Considerations
If the subject has a hard time bowing forward without losing their balance, use assistance! The subject can brace themselves on a chair or someone else can help hold them up.
The only requirement for this pose is that the Upper Spine sensor is tilted forward from the Standing Pose upright position.

Troubleshooting
Q: When performing the Walking Calibration, I am running into an error message that states “Backwards walking too short.”
A: This means the overall walk was too short. Try having the subject walk farther.
Q: When performing the Forward Lean or Multipose Calibration, I am running into an error message that states no valid posture could be found for [segment].
A: That segment was not at the expected tilt angle. Check the description of which segments are calibrated for each pose in this article and ensure the subject is in the correct position.

