The 10-Meter Walk Test (10MWT) is a simple, easy-to-administer assessment of functional mobility, gait, and vestibular function, which measures a patient’s walking speed over a short distance.
Preparation
Required Noraxon Hardware:
- 3 IMU sensors (placed on the Left Foot, Right Foot, and Upper Spine)
- Camera (optional)
Required Additional Items:
- Tape measure
- Tape or other objects for marking a 10-meter pathway.
Test Setup
- Identify a clear pathway of at least 10 meters (32.8 ft) in length in a designated area over solid flooring.
- Measure and mark the start and end points of a 10-meter walkway.
- Add marks at 2 meters and at 8 meters to mark the central 6-meter section used for the test.
Noraxon Setup
Step 1: Place 3 Ultium Motion sensors on these body segments:
- Upper Spine
- Left Foot
- Right Foot
Refer to the 🔗Ultium Motion Getting Started Guide for further details on setting up sensors in the Hardware Setup before proceeding.
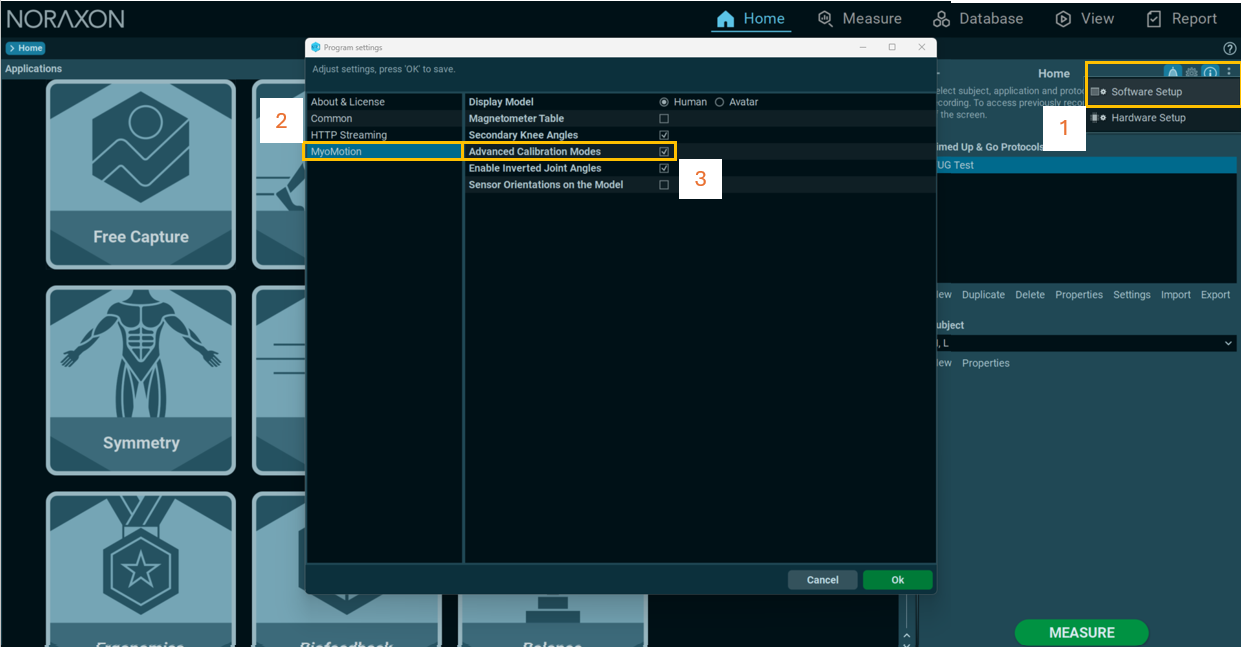
Step 2: If needed, enable Advanced Calibration Modes from the Software Setup.

Step 3: Create a New Subject or Select one from the list.
Step 4: Select the Mobility Application and the 10-Meter Walk Test Protocol.
Note: If desired, click Configuration when the 10-Meter Walk Test protocol is selected to confirm the configuration contains the Upper Spine, Left Foot, and Right Foot sensors.
Step 5: Click MEASURE from the HOME screen or the Configuration screen to start the protocol.
Calibration
Step 1: Select the Multipose Calibration Mode, then click ACTIVATE.
Step 2: Follow the calibration wizard to perform the multipose calibration. The patient should perform the calibration at the 0-m mark (start line).
- Standing Pose – Stand with feet pointed forward and straight spine. (The subject must be completely still for ~5-7 seconds.)
- Bowing Pose – Bend forward at the waist (~30 degrees of tilt on the Upper Spine).
- Left Leg Pose – Place left heel on the ground and plantarflex the left foot ~30 degrees
- Right Leg Pose – Place right heel on the ground and plantarflex the right foot ~30 degrees
- Standing Pose – Stand with feet pointed forward and straight spine.
Step 3: After completing the calibration, select Save & Measure Again, then ACTIVATE to apply the calibration and proceed to the recording.
Recording the Timed Walk Test
When the patient is ready, click RECORD.
- Capture a Return to Ref Pose in MR while the patient is standing still at the 0-m mark.
- Instruct the patient to perform the 10MWT following any verbal instructions given, per the type of test performed as described below.
- Capture a Return to Ref Pose in MR after the patient has finished walking and is standing still at the 10-m mark.
Timed Walk Instructions:
- Have the patient start at the 0-m mark (start line) where the calibration was recorded.
- For a test performed at a comfortable walking speed, provide these verbal instructions:
“Walk at your own comfortable walking pace and stop when you reach the far mark.”
- For a test performed at a fast walking speed, provide these verbal instructions:
“Walk as fast as you can safely walk and stop when you reach the far mark.”
NOTE: If the patient requires assistance, only the minimum assistance necessary required for a patient to complete the task should be provided. The level of assistance documented should reflect the greatest amount of assistance provided during the test. For example, if a patient required minimum assistance for the majority of the test, but required moderate assistance for stability on one occasion, the patient should be rated as requiring moderate assistance. Assistance should be provided only to prevent a fall or collapse, not for limb swing or in any way that propels the patient forward.
Creating the 10MWT Report
Click REPORT to generate a 10MWT Report.
Learn how to add, remove, or adjust parameters included in the report in the video below.
*Available parameters in the Timed Walk Report:
Overview:
- Walk Speed (ms)
- Walk Time (s)
- Cadence (step/min)
Timing:
- Stride (s)
- Stance (s)
- Swing (s)
- Single Support (s)
- Loading Respose (s)
Coordination:
- Stance (% of gait cycle)
- Swing (% of gait cycle)
- Single Support (% of gait cycle)
- Loading Response (% of gait cycle)
Asymmetry Index:
- Stance Asymmetry Index (%)
- Swing Asymmetry Index (%)
- Single Support Asymmetry Index (%)
- Loading Repsonse Asymmetry Index (%)
- Foot Pitch at Contact Asymmetry Index (%)
- Foot Pitch at Toe Off Asymmetry Index (%)
Foot Segment Angles:
- Foot Pitch at Contact (deg)
- Foot Pitch at Toe Off (deg)
- Foot Pitch Speed Max (deg/s)
Additional Features
Compare reports to compare patient progress over time.
Variations & Common Questions
Q: I want to measure the same parameters in the 10MWT report in a walking trial, but don’t necessarily want to perform the standard 10MWT protocol in MR. Can I use the same protocol to walk as long as I want and still use the included reports and parameters?
A: Yes! The 10MWT Report is given as an option for performing a timed walk test with 3 IMU sensors in the MR software, but it is not the only protocol that can be performed. MR will detect any number of walking intervals and turns, so the protocol can be used for any walking test distances, including custom walking/gait tests. Be sure to modify and customize the report according to the desired parameters of the chosen test type.
Q: What if I don’t have 10 open meters to do the assessment?
A: Variations to the 10MWT exist, including the 5MWT, 🔗6MWT, and 🔗T25FW. Clinical recommendations include a “rolling start and finish” during the 5MWT to allow for acceleration and deceleration. It’s important to note that the 5MWT has not been validated as heavily or for as many health conditions as the 10MWT.
Q: Can the patient use an assistive device during the test?
A: Yes. Recommendations include documenting the assistive device and keeping the assistive device consistent between compared trials.
References
For more information, reference the 10MWT instructions and FAQs included in the standard clinical protocol for the 10MWT from the Shirley Ryan Ability Lab, linked below.

